I go further than that. Any power cable gets a piece of masking tape at the plug end with what it goes to written on it. Patch-type cables get masking tape at each end labeling what they’re plugging into.
I like wallpaper. I like putting it up; I like the way it looks; I even like scraping it off.
What on earth are you talking about???
I’m telling you, guys, do it right and you don’t need to sand. Use only clean smooth compound, push down firmly so you get a nice flat layer, and just slide the knife over it to smooth it out when it’s dry. It takes longer, but a home owner has the time.
But the paint peeling off didn’t seem to be a primer issue; I scrubbed down the wall before painting, and it started to bubble right off the wall. The wall was definitely powdery underneath that.
[And I have always lives in older houses.]
Yup. I have a decent pair of pruning shears on my shopping list for next spring, too. We’re also in the market for a new lawnmower - I think I’ll keep your advice in mind and get a good one, not a cheap one.
If you drop a small part, stop what you are doing and look at where it lands, then put down what is in your hands. You will have a much easier time of finding that bit in the carpet/grass/hay when you know where it is.
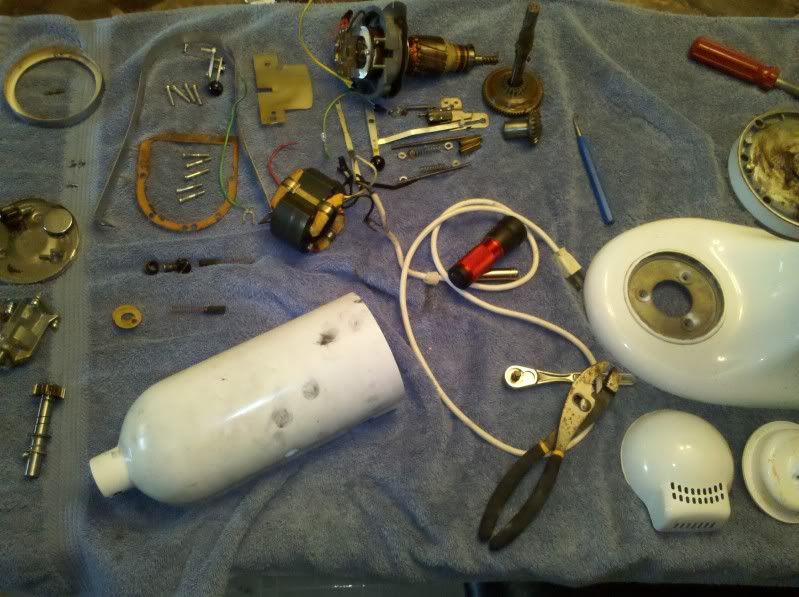
When you’re taking something apart with lots of tiny screws and stuff, put the parts on a towel so they don’t roll away.
OK, here’s one I should patent:
If you are repairing a laptop (or other electronic device, but laptops are the worst), you are going to end up with a zillion screws, many of which are identical except for length. Putting them all back in the right place is going to be a big challenge.
What I do is: Take a roll of blue masking tape, and stick each screw next to the hole where it came from (or as close to it as practical). Then, when you are re-assembling it, you just keep looking for blue, and once there is no more blue, the laptop is back together, and all the screws are in the right place.
Not that good if you’re working with something that has DIFFERENT sized screws, like an iPhone. Hence my post that you kinda missed I think.
Marry a handyman.
Let me rephrase. You are wrong. Objectively and unambiguously wrong. Sure, repairing a small crack or dent you can take care and not have to sand, but joint compound is intended to be sanded. I don’t know what you’re doing for the paint to bubble (applying oil based on top of latex or viceaversa, not allowing the compound to dry fully) but it has nothing to do with sanding.
Actually, it works perfectly for any assortment of screws - it eliminates having to keep track of which screw goes where.
That won’t work - then you’ll be terribly frustrated because he CAN do all this stuff and just doesn’t. ![]()
Marry a left handed handy man - then one of you can always reach into those tight little spaces.
Um … no. I’m not. Really. I have lovely walls. My ceilings don’t get seams, either. It take me weeks, doing them after work, but see above (buy a house with one extra room). I learned the technique watching an old plasterer rock a wall. He LOVED wallboard.
And what I am doing to the walls is just washing them - I did not mud the walls the paint peeled off, I just bought the house. (The paint job was perfect, other than that. Weird.)
RE: tiny machine screws.
I have a bunch of rare earth magnets (not dangerously strong, but strong enough) I bought cheap at a souvenir shop a while ago. I’ll set a handful of them out, when I’m unscrewing the machine screws to a device, and according to size or order, I’ll plop them on one or more of the magnets, so I know which screws went where, and they’re stuck somewhere they won’t wander (and are easy to retrieve).
Assume they did it wrong and proceed accordingly.
In other words, if you’re replacing an outlet, assume somebody wired it all to fuck hell and back. Test it with a good tester even if you think you got the breaker. When in doubt, flip the main one.
We’ve lived in this house for 20 years now. This has been our #1 bit of DIY wisdom for the past 18 of those years, give or take.
Built a 14 x 28 deck this summer. Fought with curved boards, knots, etc. My mantra was “Wood is a natural product. It contains certain blemishes and defects that giv e it character”. I know what you mean though. all you see is that thing you should have replaced when you were doing it.
Ah well, in a few beers you’ll forget all about it.
Oh, and I’ve got on section of railing that’s twisting. grrr.
Get yourself a small generator. At some point in time the electrical supply to the house will get borked in some manner or another. This way, you can proceed with the repair jobs while waiting for the electrician to come and fix what you borked up.
Besides, at some point in time or another you may need to rewire the house, and so the power will be turned off, if you have a generator you have lights, and a microwave to nuke food with while there is no electrical service to the house.
Our solution to this problem is that all electrical (and plumbing) work is to be done only during hours when the hardware store is open.
You know those assemble-it-yourself swingsets with the clubhouse and the slide and all the other bells and whistles? I put one of those together in the summer of 2010, with some help from my friends.
Here’s my tips for one of those:
- Before you order, make sure you’ve got enough room for it.
Not just for the footprint of the swingset itself, but for room for a kid to let go of the swing as it’s going forward, and go flying through the air before landing. And also to put a border around the whole thing so you can lay down mulch without it winding up all over your yard. Because young kids using a swingset are going to wear down all the grass in no time flat.
So before you order, get the dimensions of the thing itself, then figure out how much additional room you need. If you’ve got obstacles like trees, shrubbery, nontrivial slopes, sheds, deck, etc. that might come into play, draw yourself a scale map of the relevant part of your yard, scan it, and print out copies that you can draw in the various swingsets you’re considering on.
-
When it arrives and you unload it from the shipping boxes, label everything. Find the piece of paper that tells you all the different pieces of wood you have, all the different nuts, bolts, and screws. Get a magic marker to label each piece of wood; get zip-lock baggies to put screws of the same kind in, and write the appropriate alphanumeric codes on the bags.
-
And, of course, check it all off against the list of pieces, so that you’ll know you’ve got it all. If you’re missing something, there should be a number to call for any missing pieces.
-
Give yourself a month’s worth of weekends to assemble it, even if you’ve got friends helping you. First of all, you won’t be able to think through the whole process at once well enough to explain to your friends what they can do. Second, you can get a weekend or two of rain, which will slow you down.
-
If you’ve got a garage or basement work area, you can make some progress on rainy weekends. There will be sections you can assemble indoors that you can get out your basement door once it stops raining.