Funny! I had dark red goggles. Useful for astronomy and darkroom preparation.
Kodak had papers for printing from reversal films (slides, chromes), they were just kind of expensive. Cibachrome kicked butt in that market.
You could print from a Kodachrome slide just as well as an Ektachrome (or Fujichrome) slide.
Inexpensive exposure/color monitors were all over the hobbyist market back in the 80s.
Early to mid 1980s was a great time for amateur darkroom enthusiasts.
.
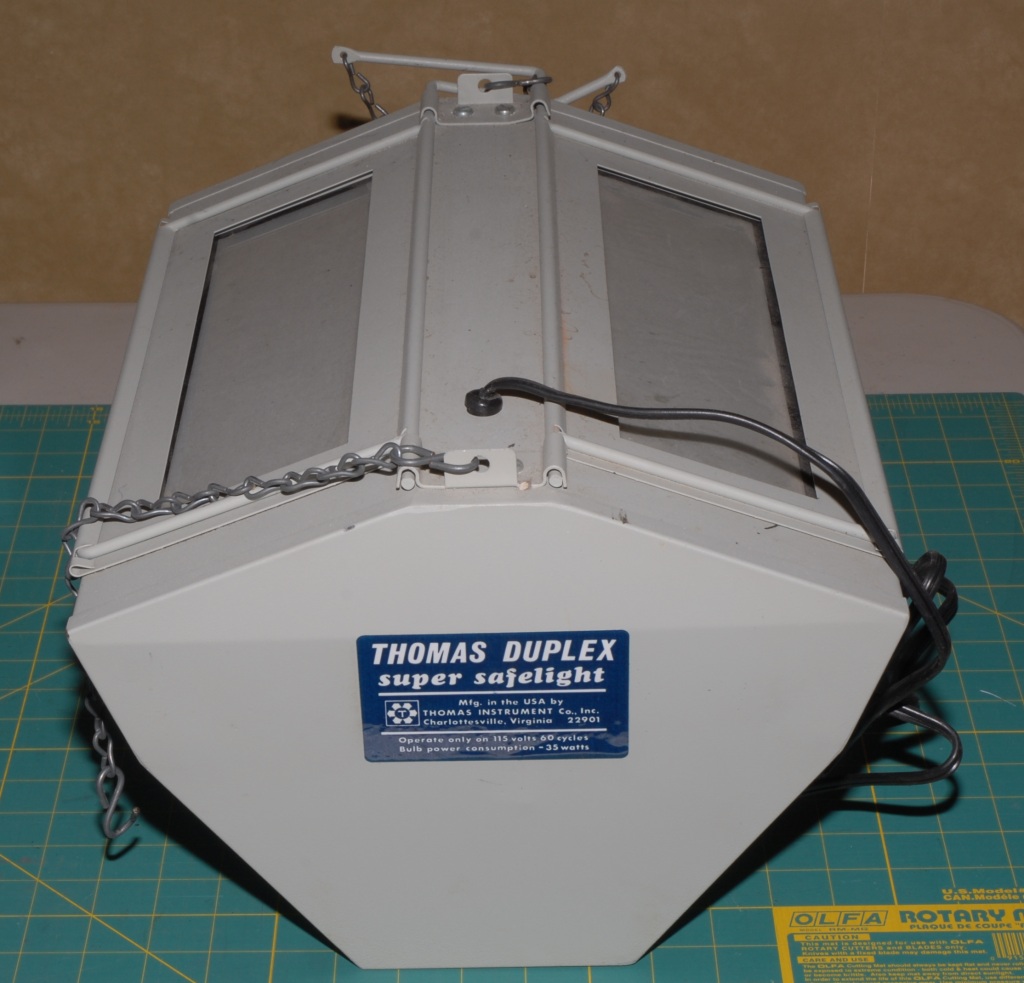
We used one of these Thomas Duplex sodium vapour lights in the print darkroom (black and white).
It emitted yellowish light, the same as that by sodium-vapour streetlights. It was the brightest darkroom light I’ve ever seen and panchromatic printing paper never reacted to it. Its brightness was adjustable by the hinged flap on each side.
You can get an idea of its weight by the chains used to suspend it from the ceiling (though the one we used was on a counter).
Sure. I’ve done Cibachromes and, later, Ilfochromes. But transparencies really were t printed by the average shooter. Other than a Cibachromes here and there, I have pretty much no prints of my transparencies except for what has been published in magazines. If I were shooting to print, I would generally shoot print film (neg.)
You could also print, as I’m sure you know, via an interneg. That’s how my local photo finishing place generally printed transparencies, as it was a lot cheaper than Ciba/Ilfochromes. It also looked terrible, IMHO.
The average shooter wasn’t a darkroom enthusiast. The average darkroom enthusiast didn’t do color. There was still a substantial enough market for all that stuff.
Yes, the red light only worked with non-special B&W paper.
B&W photo film by the 1960’s was generally panchromatic and sensitive to red light as well as higher colours of the spectrum.
(IIRC there was film for specialized applications like making interesting prints that was not red-sensitive, but very rarely used.)
For film, for colour paper, everything was done in the dark.
For 35mmm (or similar) you laid everything out, turned off the light, then extracted the film and loaded it onto a reel in the dark. Once you had closed the reel in a tank, you could now do everything in normal light. The tank would hold a reel of film, had a funnel shape on the top, so you could pour the chemicals in, use a rod to rotate the film reel inside it and then pour it out without exposing the film.
For black and white paper, you could do the entire process in red light -
open the box, take out paper and place the paper under the enlarger.
-expose the paper, then run it through the developer, stop, and fixer baths.
It was one of the most intresting aprts of developing to watch the picture emerge in the developer tray and then have to guess under poor red light whether the picture was properly developed. Theoretically you could go strictly on timing, but you could salvage a mistake somewhat by watching and developing for a diferent than optimum time.
I did develop a few colour pictures. For that, you did the entire exposure in the dark. then you loaded the exposed picture into a small drum and you could process in the light. the drum was light-tight, but had a pour spout at the end so you could pour the sequence of chemicals in and out. You could get pretty good results from home processing.
I never developed colour film at home. There were kits to do so in the 70’s and 80’s, but my general attitude was that the only thing you could that the commercial processors could not do for film, was mess up the processing. (I suppose if you had NSFW pics you might want to try developing the film yourself.)
I agree on all counts.
Developing color film was, actually, in some ways and depending on what chemicals you used, less of a hassle than black and white. You didn’t have to look up different times for different films. The process that most newspapers and wire agencies used when developing on-site was using a two-step chemical process that consisted of a color developer and blix (bleach-fix combination–this was a quicker kit. Traditionally bleach and fix were separate steps). All films, IIRC, were 3.5 min in the developer (unless you’re push- or pull-processing) and then something like 6.5 min in the blix. Then wash and you’re done (oh, wait, forgot there’s a quick 30-second run through some stabilizer at the very very end). The only thing that is tricky is the chemical temperatures have to be monitored a bit more closely. We’d us some kind of aquarium water heater-like thing in a water tank set to 39C (or maybe 39.5C), and we’d put our chemicals in metal tanks set in the water bath. Once up to temp, we just kept everything in the dark and didn’t bother to use the tanks with the lids (although you can do it that way.)
As a random anecdote, the first time I developed color film was working for AFP developing the film during the last three rounds of the NBA playoff series here in Chicago during the Bulls fifth run at the championship. I was shitting bricks, afraid I was going to screw something up, and then was relieved to find out it was as easy if not easier (and I personally find it easier) than developing black and white.
I had a spare bathroom set up at home as a darkroom. Kind of cramped, but usable. I was using a Beseler 23C-IIXL Dual Dichro, so you can imagine how cramped it was. When a friend and I decided to open up a studio, we rented an office space with a kitchenette. Man, was I happy to not stoop over anymore!
I always enjoyed the color printing experience. (I got my papers at cost then.)
The Minolta rep let us use his enlarger with the Minolta 45a color head with built in color analyzer set up for a while. Now *that *was a fun way to print color! I chose not to afford that myself, but I sure did enjoy it.