Simple question, really. I’ve just always wondered. Is there any type of steering mechanism whatsoever for controlling a train, or does one simply maintain appropriate speed for whatever the various rail conditions are at the time? What else does the engineer of a modern locomotive engine need to be concerned with?
You can’t steer a train. That’s what the tracks are for.
On modern electric trains, the controls are pretty straightforward: a lever to control the speed and brakes, and an emergency brake control. The speed control has a “dead man’s switch” that requires constant downward pressure to operate, so the train stops if you die and let go.
Diesel-electric trains are more complicated to operate and also have a few different braking systems because they usually haul very heavy freight loads.
No steering mechanism. Throttle and braking controls mostly. Concerns include maintenance work taking place, trackage speed restrictions, aspect signals (stop, approach, clear, etc.), monitoring brakeline air pressure, keeping the train stretched against couplers, noting rail conditions ahead such as a warp or buckle, or debris preventing safe passage.
When I ran a small oil-fired steam switch engine at the Southeastern Railway Museum, the main concern was a) not going too fast for a small, circular track, and b) making sure there wasn’t anything or anyone on the track ahead. I never failed to suprise me how many parents would bring small children to the museum and not watch them, even though we had an engine running and there was sometimes broken glass from cars that had been vandalized before we got them. We had signs all over the place telling people to stay off the equipment because it wasn’t safe, but they would actually put their kids up on stuff, going under ropes or barracades to do so. When I would sound the whistle to warn that the engine (dear old No. 97!) was coming around a curve to the loading area, several times I had mothers yell at me because “You scared my child!!”
So, no steering. Just a lot of watching. It sure was fun, though!
(Another steam engineer here)
First, what a steam engine backhead looks like:
Backhead
That photo has nice labels to let you know what things do, and keep in mind that that locomotive is rather large and more complex than the one I work on. The fireman would be responsible for maintaining a healthy fire (wood, coal, whatever) and keeping the pressure at the correct level. For the engineer, he’s mainly concerned with the throttle (in a steam locomotive, the throttle opens a valve that admits steam to the dry pipe and into the cylinders), Johnson bar (the “transmission” of a steam locomotive; if the bar is all the way forward, steam is admitted into the cylinder for the duration of piston stroke and the wheels go forward. If the bar is all the way back, same thing except the wheels turn backwards. After we get going, we apply “cutoff” by easing the bar back nearly to halfway, admitting only enough steam to keep us at speed. Wow, that was a long parenthetical), and brakes.
Generally, the fireman also handles boiler water level.
Moving on.
The next photo is of a so-called AAR (Association of American Railroads) control stand:
AAR Control Stand
They cut the brake levers out, but you can see the light gray section at the far left. There are two handles there; the top is the “automatic” or trainline brake, which applies BOTH the brakes on the locomotives and the brakes on the cars. The bottom lever is the “independant” or locomotive brake, which applies only engine brakes.
The vertical handle just to the right of the brake stand is the horn lever. Pull it toward you to sound the air horn.
The red button is the “alerter reset” button. After a certain period of time (generally about 30 seconds) of inactivity (no blowing the horn, no touching the throttle or brakes) an alarm will sound, and the engineer must press that button or manipulate a control or the locomotive will cut out the traction motors, apply the emergency brake, and stop.
The switches are for lights and such.
The top horizontal lever in the middle of the photo is the throttle, divided into 8 “notches” plus idle (where it is in the photo.) Pull it toward you once, and you’re in Notch 1, the lowest power setting. Notch 8 is wide open.
Below that lever is the reverser. It is in forward in the photo, so the train moves forward.
Above the throttle you can see a patch of steel. That’s where the dynamic brake lever would be. Typically they were also subdivided into notches, but it looks like this locomotive had the dynamics pulled. Dynamic brakes, in essence, reverse the traction motors. The train rolls against them and generates electricity (and resistance) and the energy is let go by way of giant toaster coils outside. Used to be an option, and mostly used on mountain lines, but dynamics are very common today.
The two large gauges at top left are air. Each has 2 needles. The engineer can see how much air: is in the main res, or tank of the locomotive, is in the brake pipe running the length of the train, is in the brake cylinder of the locomotive, and is in the equalizing res of the locomotive. It’s a little complex to explain, but that’s what they are.
The smaller gauge in the middle at the top is the ammeter. It lets the engineer how the traction motors are “loading” when he opens the throttle. When you first notch up, the needle will jump, but as the motors load it will gradually fall to a lower number. Too much amperage at once will break a knuckle.
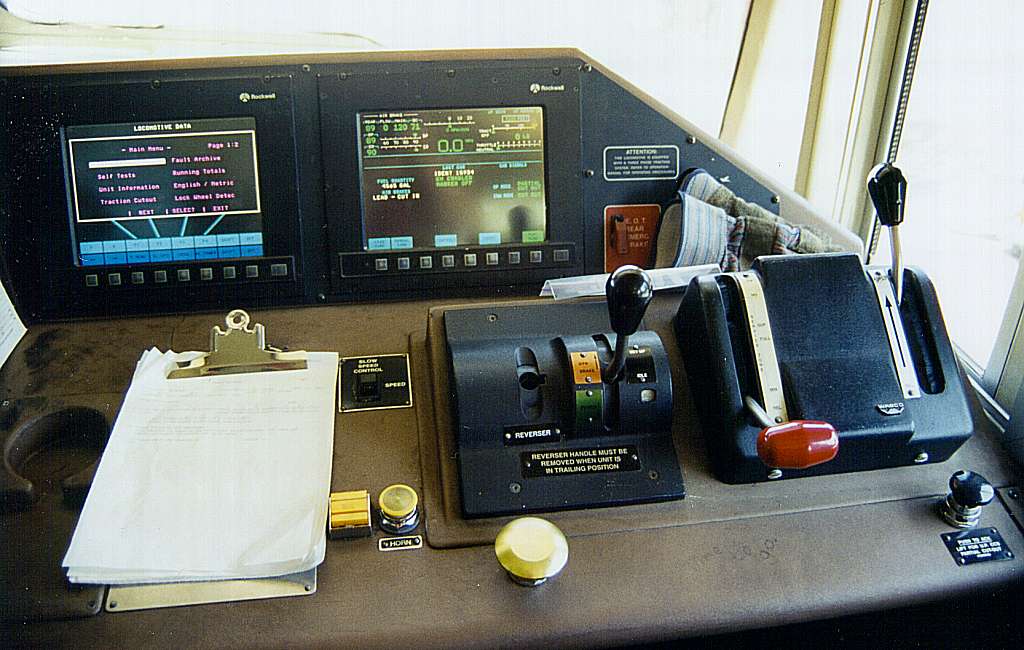
Finally, we have the new “desktop” control stand:
Desktop stand
This operates on the same principle as above, except the levers are vertical and the gauges are digital.
In that pic, the reverser has been pulled out (its recepticle is empty) for safety. The integrated throttle/dynamic brake lever is next. Pull it down for your notches, push it up for dynamics. Red lever is automatic brake. Far right lever is independant brake. Big yellow button is alerter reset, and the horn no longer has a lever; it has a little bitty button.
It’s pretty simple, until you get out on the line.
Excellent post.
I took my son for a ride up front in an suburban train (EMU - Electric Multiple Unit) because my friend was at the controls and kindly let us come along. Later, my son declared, “Driving a train is EASY! There’s the horn thing, the stop thing, and the go thing.” I told my train driver friend who said, "Sssh! Tell him not to tell anyone that!
Driving a train is quite simple in theory, but as mentioned in the quote above, there is a lot more to it in real life.
The main thing to understand is not to think in terms of comparisons with road vehicles, because there are a lot of differences in approach (not just the obvious steering one).
STEAM
The “cut-off” or reverser is a wheel, bar, or lever that is probably the most “car-like” in that it’s kind of analogous to a gear stick. The throttle regulates the steam pressure being admitted to the steam chest (where the pistons are), but the cut-off relulates how long steam is admitted. For starting off, you’d have it fully open so that steam is admitted for the duration of the stroke. This is like first gear. As you pick up speed and momentum, you gradually wind it back until the steam might be only admitted for, say, 20% of the piston stroke (it’s important to remember we’re driving an EXTERNAL combustion engine here - compression and power is the same stroke). This is where the gear stick analogy falls down a little bit though - if you were to leave the cut-off fully forward, the locomotive would still pick up speed nicely (unlike a car which would redline and be limited in speed), but you’ll use up all your steam very quickly. “Cutting off” the steam a little when you’re at line speed also has the added bonus of increasing efficiency in a second way by allowing the steam time to expand more in the cylinder, getting greater work out of a given volume of the stuff. The ideal setting for the throttle and cut-off when cruising is often called “the company notch” because an experienced driver will find this sweet spot and it will save the railroad’s coal expenses. Steam provides good torque at starting speeds, but it is not smoothly applied, and it is easy to wheel slip. Locomotives have sand which can be applied to the rails to overcome this (so do diesel-electrics, but it’s not needed as much).
DIESEL-ELECTRIC (also diesel-hydraulic, sometimes)
With the exception of a few very light single-car passenger vehicles (some even converted road vehicles), and some small hydraulic locos, there is no such thing as a diesel locomotive. They are all electric locomotives, the only difference is some use an overhead wire, and the others cart about their own power station with them. It would be virtually impossible to provide a mechanical transmission robust enough and easy enough to drive for direct diesel power to be used. Unlike an internal combustion engine, electric traction motors (mounted in the bogies [trucks]) are providing excellent torque from a standing start - just like steam does.
A typical heavy freight locomotive will have eight “notches” or power settings on the throttle. Driving a frieght train requires very judicious use of these or you will a)derail b)snap your train in two c)spin the wheels until the rails get soft and you sink in (a google image search on “Rail burn” will show some entertaining pictures of this last event).
Controlling a long, heavy freighter is an art form. You might crest a hill, and the car driver in you would be wanting to brake, but the train driver would realise there might be 4000 tons still climbing the hill, so you might have to even throttle up to maintain speed. Or vice versa at the bottom of the grade. There are many other things. Braking these things is a complexity which would require a much, much longer post than I can write here.
ELECTRICS
Most electric trains are passenger trains from subways to larger intercity ones. These are a whole different beast to drive. Traditionally, there were only five notch settings on the throttle, but modern trains tend to have technology which eliminates these, and gives a more car-like continuously variable throttle. These are supposedly the easiest trains to drive (well my freight driver friends would say so!), but there are other factors unique to it. You have to pull up the train smoothly at every station so each doorway is within a few inches of a certain spot on the platform. A commuter driver might have to get this right hundreds of times per day. Not always easy with 400 tons, steel on steel, and you might be in a different train every day, with different braking characteristics.
You have to maintain passenger comfort levels (acceleration and braking forces). Here’s what used to happen with the old 1920s suburban trains in Sydney. They were manufactured with cast iron brake shoes. This was fine, but they wore out too quickly, so were replaced with a composite material. This worked too, but it tended to polish the wheels to a high shine, and this had interesting effects for the passengers. A typical train was eight cars long (motor + trailer + trailer + motor + motor + trailer +trailer + motor). A typical Sydney suburban station was located in a cutting with a bridge over one end (carrying the main street of the suburb). So on a wet day, the driver would notch forward, and the train would leave the station with the wheels slipping on the wet rails. No drama as the wheels were all slipping at more or less the same rate. But then the lead carriage would pass under the bridge, and the wheels would grip on the dry rails. The front of the train would suddenly stretch. Then the front car would appear out the other side of the bridge, and back onto wet rails. The powered wheels in the middle of the train would then by on dry rails, and the stretched out first half of the train would suddenly compress, with much banging of couplers and annoyed passengers. The back half would stretch. Then the middle would pass from under the bridge, and the rear motors would be under it, slamming the back of the train fforwards. Good fun if you were a railfan, but the commuters and drivers hated it.
The modern trains have disc brakes and ABS-type systems, as well as regenerating motors. The motors slow the train down until nearly at a walking pace and the disks take over. Much smoother.
ALL TRAINS
The biggest difference with cars is the signalling. Road traffic lights keep vehicles on opposing paths separate. Railway signals do this too, but they also keep trains on the same track at a safe distance apart. The first thing car drivers are usually told is “always be able to stop within the distance you can see”. Trains can’t necessarily do this, so the signals need to reflect that fact. A typical signal “aspect” (what code it’s showing) will comprise of two lights (sometimes three). They differ all over the world, but on my local railway it is as follows:
The top light represents this signal (The one you’re looking at), and controls the section of track immediately following it. The bottom light represents the next signal and its section of track. You can stand on a platform and watch a train pass by a signal, and over the next several minutes, the aspects will change. This is a basic selection (there are others)
GREEN OVER GREEN: Clear Train may maintain posted line speed.
(train passes)
RED OVER RED: Danger You may not proceed pass this signal
(in reality, a train would seldom see this in this scenario because it couldn’t have caught up with the one just passed, as will become obvious below)
YELLOW OVER RED: Caution You may proceed at such a speed that you can bring the train to a stand at the next signal, which is at danger because the section beyond is occupied. (this signal is yellow, the next one’s red)
YELLOW OVER GREEN: medium cautionYou may proceed at such a speed that you can bring the train to a stand at the signal beyond next. The next signal is at caution, and the one beyond at danger.
GREEN OVER GREEN: Clear First train is now far enough away that you can safely ignore it, but if you do start to catch up with it, later signals will reflect this, and slow you down again.
YELLOW OVER YELLOW: turnout medium caution You will take the diverging road at the next switch. Obey turnout speed. Signal beyond is at caution or clear.
YELLOW OVER RED: turnout cautionYou will take the diverging road at the next switch. Section beyond may be occupied. Prepare to bring train to a stand at the following signal.
Each signal goes through this cycle one step later than the one ahead of it, after a train passes. Just like a yellow traffic light, they do not have prescribed speeds for each aspect. That’s up to the driver, and the weight of the train. Sections of track on railways which have freight traffic are much longer than on, say, subways. This is one of the reasons for delays with things like Amtrak. The NYC subway might be able to handle a train a minute because all trains can stop quick(ish), but an intercity railway only needs to have one freight train using it for the signalling system to be freight-style, and passenger trains have to put up with it.
One last fundamental difference with cars is the use of inertia and momentum, even on passenger trains. If you want to get a suburban train to a station two miles away on level ground, you will likely be coasting most of the way. You can throttle out of the station, and when you get to line speed, just notch back and sit there for the ride, starting to brake a short distance out from the next platform. Many of the world’s subway systems are designed with the stations on “hills” at a higher grade than the intervening track. The other week, my train driver friend said, "Watch this. I’ll just give it a couple of seconds of Two Notch to get us rolling, and then we’ll coast to the next station. And we did. He cut the throttle at about 5 or 10 mph, we got up to about 45mph at the bottom of the dip, and just pulled up nicely at the next station so he barely had to touch the brakes right at the end.
Another difference in running a steam engine now (the few that are left) and when they were running for the intended purpose of hauling trains, is that when excursion passengers are let off the train for a photo run-by (the train is backed up and sent down the track past the viewers at a good speed, allowing video and still photography) they want a “dirty stack”. They want a nice black plume coming from the smokestack of the engine, because it photographs better. It also wastes a heck of a lot of coal!
And, typically, people want the cylinder cocks open, pushing out a bunch of steam on the sides.
FWIW, my train burns propane, so we can’t make a dirty stack. Makes life a heck of a lot easier for the fireman, too. 
John McPhee’s new book, Uncommon Carriers, has a long section about driving the huge coal trains from Wyoming to Georgia. Fascinating read if you’re interested in this kind of thing.
D’oh! I meant GREEN OVER RED and GREEN OVER YELLOW, respectively.
That’s interesting. Here, a GREEN OVER RED aspect is clear, indicating that the train can proceed at track speed. We don’t have GREEN OVER YELLOW, either, that I know of.
As far as the U.S. is concerned, signaling was/is usually dependant on the railroad. In the present days, after the megamergers, there are fewer types to learn, but IIRC UP and BNSF don’t use the same method.
There is also a difference between U.S. “route” signaling, and “speed” signaling. Or, to make things more complicated, a mixture of both:
Cite
The UP main is about 100 yards behind my house, so I’ll link to a chart of their signal rules:
U.P. Signal Chart
The KCS passes through town, and they use the same system (with possibly fewer possibilities).
To complicate matters even further, U.S. signals can be broken down to “Absolute” or “Permissive” types. In the UP chart, you’ll notice mention of “A” plates and number plates. In the bottom two examples, the signal aspect is the same: RED, RED OVER RED, etc. The difference is that when a train comes to a red signal with a number plate, it is permissive. The train can stop and then proceed through it without contacting the dispatcher.
The very bottom example is an Absolute (because it has no number plate) and the engineer must STOP and contact the dispatcher, who actually controls that particular signal. Permissives (or intermediates) aren’t under the DS’s control; they’re automatic.
If anyone is ever on an Amtrak train, do try and bring a scanner with the RR freqs, so that you can hear the conductor and engineer relay the signal information back and forth. The conversations are absolutely intriguing, as it’s usually:
Engineer: “Approach medium to approach” (He sees the first signal as YELLOW OVER YELLOW, and the one after it as YELLOW)
Conductor: “Approach medium to approach, over.”
Anytime there is a signal less permissive than PROCEED, the engineer must call it back to the conductor, and he must repeat it. He then logs the milepost, signal indication, time, etc. on his delay report. It gets even more fun when the weather is really hot, as the two pass on not only signal indications, but the temperature readings of hotbox detectors.
Gosh I love trains.
It’s actually the same as that just across the border in the Australian state of Victoria. Living in New South Wales, I find that weird: I can’t get my head around the colour red having anything whatsoever to do with a clear aspect. I guess it’s what you’re used to.
I have “driven” US trains on Microsoft Train-Sim, but I’m still learning the aspects, because I tend to stick to Australian stuff.
Just to more directly answer the OP, trains do often have steering concerns, but they are remote from the driver.
If you take a steam locomotive, for example, you will see large and small wheels. The combination is called the “wheel arrangement”, and on a typical mid-twentieth century passenger express locomotive, might look something like this: o o O O O o (with the locomotive facing to your left). That’s a Pacific wheel arrangement (4-6-2, counting the wheels on both sides) The six large wheels in the centre are the driving wheels (powered). The four on the right are the trailing wheels (unpowered). These support the weight of the cab. The two at the front, also unpowered, are the leading wheels, and these are the ones we are concerned with. Like the trailing wheels, they provide a load-bearing function, but they also assist with guiding the train into curves. If you took two LP records, cut flanges into the edges, stuck a pencil through the middle and rolled them down a child’s toy train track, at the first curve, the thing would likely just climb over the rails and continue across the floor in a straight line. This is because the diameter is so big that the leading half of the flange (the part about to come down to the bottom of its circular path) will actually jut out over the rail and won’t be guided by it. Prototypical steam locomotives often had this problem too. The large driving wheels would suffer ‘flange climb’ if the little ones weren’t out ahead. The little ones are usually also mounted on a bogie or truck which can swivel, and this leads the train into curves. Some smaller steam locomotives like shunters, did not have leading wheels, but this was because they were usually operated at low speed. Some large ones didn’t either, but these were usually freight locomotives which had smaller driving wheels (small wheels = more power, less speed) so the problem wasn’t so pronounced.
All modern locomotives and rolling stock are also mounted on swivelling trucks, again to assist in correct tracking through curves.
If you have a look next time you travel by train, you may notice that on some sharp curves, there is a black, oily stain on the tracks, and a metal cylinder next to them. This is a permanently mounted grease gun which greases the side of the rail at that point, and the passing flanges carry the grease forwards a little way. This prevents “flange binding” on curves. So it’s also a “steering” concern.
Some eye candy for SnakesCatLady and Blake Tyner:
A few snapshots of a run I did in March behind Australia’s most famous locomotive, the Pacific Streamliner 3801. She has usually sported a handsome green livery, but they’ve recently done her out in wartime grey (as she first appeared from the shops). It’s quite good though, I think. Australian steam enthusiasts are blessed in that we have a much stronger mainline scene (versus preserved railways) than the US - or so I’m told, and this was a run along the spectacular “Short North” line from Sydney (runs up the east coast). I’m sorry I don’t have more, or better full shots of the loco (battery was on the fritz), but enjoy:
http://img46.imageshack.us/img46/3135/mvc001f0dk.jpg
Backing up through the modern maze of wires and tracks of Sydney Yard to Platform 1, Sydney Central to join her consist of historic carriages.
http://img250.imageshack.us/img250/5933/mvc004f0ly.jpg
Coupled to her train. Ready to roll: “3801, you have the road”.
http://img228.imageshack.us/img228/7325/mvc005f9jl.jpg
HISSSSS!
http://img222.imageshack.us/img222/3310/mvc009f4pg.jpg
http://img162.imageshack.us/img162/2732/mvc020f3ql.jpg
http://img273.imageshack.us/img273/4176/mvc010f0gp.jpg
A view of the good stuff. The tyres were traditionally painted black, but they’ve fitted new, shiny ones. The purists are aghast, but I think it looks very rakish. I like 'em.
http://img301.imageshack.us/img301/7792/mvc006f9xw.jpg
Underway. Australian trains run on the left track, so in this case, the left-hand track is a refuge loop for slow trains to be passed. We are on the main.
http://img301.imageshack.us/img301/6769/mvc013f8kw.jpg
Another rather blurry shot, I’m afraid. '01 backs off the turntable at Gosford onto “turntable road”, blowing off steam as the volunteers shovel coal forwards on the tender. You can see the streamlined nosecone. It was based on an American design ( I think in Chicago). The streamlining actually added seven tons weight, and did little for speed, but it was liked by the travelling public of the day. The first five in the class of thirty got the streamlining (3801 - 3805). The rest were plain (3806 - 3830). I liked those too. Only '01 and '30 remain in working condition.
http://img102.imageshack.us/img102/2239/mvc023f2yz.jpg
Watering at the city of Gosford. 3801 is detached, and running light engine around her train.
http://img235.imageshack.us/img235/2001/mvc021f0cx.jpg
The old and the new at Gosford (well, okay, the old and the 70s ![]() )
)
http://img484.imageshack.us/img484/8643/mvc019f7zm.jpg
The historic carriages
If anybody else here is into Microsoft Train-Sim (fun, despite it’s bugs, and you can pick it up for five bucks in the bargain bin these days), I suggest you download the free Australian route “Coals to Newcastle”, which beautifully recreates the route I took this day. It’s got a combination of city running, 1 in 40 winding mountan grades, and some “stretch your legs” 70MPH straights. You can download this locomotive and rolling stock for free too. Much better than the Microsoft routes. You’ll need a resonably fast computer.
Very nice…my heart is always warmed when I see steam running in the modern age.
That locomotive looks very much like a Norfolk & Western “J” class, seen here:
N&W Class J
As far as eye candy goes, I got the following about a month ago. This is Union Pacific’s 4-8-4 number 844, the second-largest operating steam locomotive in the world (with the first being their 4-6-6-4 Challenger…it came through here a couple of years back.)
http://i19.photobucket.com/albums/b156/BlakeTyner/5-24-2006-17.jpg
http://i19.photobucket.com/albums/b156/BlakeTyner/5-24-2006-12.jpg
http://i19.photobucket.com/albums/b156/BlakeTyner/0aba1166.jpg
http://i19.photobucket.com/albums/b156/BlakeTyner/5-24-2006-19.jpg
Unfortunately, I didn’t get to ride behind it. Those pics were taken when she stopped overnight in the next town. Still, a pretty neat experience (and also available for Train Simulator.)