Photographers, how do I get my photos to look more like this?

IMO thats it in a nutshell.

You have to look at your own favorite pics and pics of others, then ask yourself WHAT? it is that makes the picture “pop”.

Once you understand the basic science of photography, you should be able at least in hindsight to figure that out.

Professional photographer checking in (weddings are my game these days).

It has nothing to do with the Canon brand. Nikon lenses, Pentax lenses, whatever will achieve the same results. The large maximum aperture (f/2.8 or lower numbers) do have a lot to do with it, though. These types of lenses are available for pretty much all dSLRs. It’s hard to replicate this type of shallow depth of field with compact cameras for a number of reasons I won’t go into.

So, yes, one thing we have here is shallow depth of field. Before I even opened the pictures, I assumed that was going to be the big thing you’re noticing.

There pictures aren’t necessarily “heavily” Photoshopped, but there’s significant contrast and saturation bumps on a number of them. Most of the work, though, is in-camera or close to it.

The other thing, and perhaps THE most important thing, about the pictures: light. The light is interesting. I’m not a fan of a lot of these compositions, and some of the color balancing is wonky (what’s with the purple dog?) But the light in most of these pictures is coming from interesting, oblique angles, adding a lot of three-dimentionality to the photos. The lighting tends to be high-contrast, very little of it is flat, on-camera flash.

So, basically, you’re looking at interesting light, and low depth of field, combined with a little contrast and some saturation bumps here and there.

nm

And keep in mind that it’s practically impossible to achieve the same shallow DOF with any P&S camera. The sensors are too small to get a really shallow DOF. You can do some of that in post processing but it’s much simpler to get a DSLR with a big sensor and some good glass.

Doesn’t that depend on the f stop rather than the size of the sensor/film? Point and shoot cameras generally don’t have the low f stops (i.e., large lens apertures) of many SLR lenses.

No, it’s mainly based on geometry and optics. The physically smaller sensors essentially ensures a very large depth of focus. Fast lenses can’t overcome this; you still have a very large DOF no matter what you do.

http://photo.net/learn/optics/dofdigital/

Don’t forget that for each truly amazing or at least beautiful photo a pro photog gets, there were at least fifty dunces. Back when I used film artistically, I considered it a lucky shoot if I got even one great shot out of a 36-frame roll.

The photos a pro takes at a wedding are in the thousands, especially with digital nowadays. That’s not how many are actually chosen to present to the client, and not nearly how many actually get printed.

So, the more pics you take, the more likely you’ll get ones you really like.

I’m a pro photographer in the sense that I get paid to shoot photos and I’ve been published. I’m a writer, but I do my own photos for articles I write and I do a lot of event/band photography on the side, and I sell the ocasional art piece.

I do some similar work and as said before, it’s a combination of good glass, wide apertures, lighting, and I would bet after looking at it, lightroom and photoshop. My best guess is shallow depth, push the exposre and black sliders in lightroom, and go from there. That’ll give you that constrasty look. Looks like he’s darkened around the edges of some of the photos with the exposure brush in lightroom too…can’t say i care for that, but a lot of people I know do it.

I get people all the time emailing me asking how they can get photos like I take with their point and shoot and the simple answer is they cant. We invest a lot in our gear because that’s what it takes. I generally tell people who ask me what to buy to start out with a used Canon 20D, and a Tamron 28-75mm 2.8 lens. Even used, it’s not going to be cheap, and that’s just a beginning but it will get them started. (or the nikon equivilant, of course). I shoot a LOT in dark clubs and probably 90 percent of my stuff is shot at 2.8

I also tell them to get a copy of “Understanding Exposure” and “Understanding Shutter Speed” by Brian Peterson…After they get a DSLR.

And what Seadragon says is correct. With modern digitals people shoot more in a week than they used to do in a lifetime. Buying a high end camera you have to check the shutter count like checking the odometer on a car. I’ve done multi band shows where I’ve come home with close to 2000 raw files to sort through. Post processing that many images is a highly caffiene dependant activity. Without lightroom it would be unbearable.

I believe a number of the pictures also have added vignetting.

There are also a lot of plain simple tricks to have in your toolbox that seem obvious once you learn them but don’t immediately jump to mind. For instance, during my career in corporate videography, I had to shoot hundreds of shots of buildings - corporate headquarter, factories, etc. The simple trick there to get a good shot that doesn’t result in the sky being “blown out” (overexposed) is that if the building faces east, shoot it in the morning, if it faces west, shoot it in the afternoon. That way, both the face of the building and the sky in the background are being subjected to the same level of light, so you can get a well-exposed building, and a nice blue sky in the same shot. South or north you kind of have to play it by ear.

Video interview lighting is also pretty simple - you can learn the basics that are used in most newsmagazine-style interviews all the way up to the level of, say, 60 Minutes pretty easily - you just need the right gear. At a certain point, talent overtakes skills and correct gear, but learning those tricks will get you 90% of the way there.

So true.

I’ve been doing much canoeing lately. I have an old 3.5 or so megapixel point and shoot to take along. Its just good enough that if I focus right, don’t shake too much, and compose nearly correctly from the very start I get photo’s that can be blown up to 8 by 10 or so that I can be pretty happy with.

Buttt…I’ve quickly figured out, unless its some really special scene that I can’t photographed any other way, dont even bother taking a photo unless the sun is behind you (or maybe sometimes a fair bit off to the side or WAY up high). If you are generally looking into the sun, its rare for the photos to look decent, at least in my experience so far.

There are exceptions to every rule. I think that it’s certainly true of buildings that you want to take to sunlit side. But here are a couple of exceptions that I’ve taken:

Imgur

Imgur

In both cases, the Sun, or its refection, is actually in the photo.

Yeah, the guideline to take the picture with the sun behind is good for beginners, but I don’t like it.

Shooting into the sun can be fun, and there’s many way of doing it successfully. One is to make a silhouette of the subject. (For example). Another is to just completely blow out the sky and expose for the skin tones (if you’re shooting people) in the subject (Here’s one from one of my associates. This is actually severely backlit against a window, no flash or other light, but exposed for the foreground. It would be an exposure compensation of around +2 from what your camera will want to shoot in auto-exposure mode.) You’ll get a nice, low-contrast image with gentle lighting, although the quality of your lens really shows on shots like this (any smudges or imperfections in your lens cause light spill from the highlight areas of your subject.)

The problem with the light being behind you (the photographer) is that, for human subject, it inevitably causes squinting. Exceptions include late evening and early morning light. Photographers love “the golden hour[s]” where the light is very directional, warm-toned, and doesn’t necessarily cause squinting except in the more sensitive subjects.

My personal rule would be to explore the light. When you come across a subject, check out all the different lighting possibilities and the effects it has in your photographs. It’s nearly impossible to make a one-size fits-all generalization about how to light a subject. If forced, I’d say light off at about 45 degrees to one side (as one of billfish’s suggestions), behind you for nice frontal lighting with the 3-dimensionality the off-axis lighting gives you.

However, if you always did this, it would be boring. The really interesting pictures tend to be photographed with more oblique angles of light, backlighting, that sort of thing. Mix it up.

So, the main thing you can take from all this is that photography is literally “light writing.” Light is your paint. You need to develop a good understanding of it and how different lighting situations affect your palette of colors to become a better photographer.

I was going to comment that there seems to be some vignetting in the pictures. This can be the result of the lens (my Canon 24-70mm f/2.8L vignettes slightly on my full-frame 5D), but it’s also become a bit of a (IMHO, overused) effect that photographers use to lead your eye to the center of the frame. If you look at the old masters of painting, you’ll note this basic idea being used, where the edges of the frame are dark and indistinct and the main point of light and sharp detail are in the center of the frame. It’s not exactly the same effect, but the same idea: lead the eye by putting points of interest in light (or use slashes of light to lead the eye to the point of interest) and dull the less interesting parts in shadow.

Also, fill-flash photographs can sometimes be magical.
Imgur

True, it’s not the sun behind the subject, it’s a huge stadium light, but the effect is the same.

Yes, fill flash and knowing how to use it is one of the more important tools in a photographers arsenal. Where it starts getting real cool and interesting is when you start doing off-camera fill flashes, but that requires either a remote flash of some sort (either IR or radio-triggered) or an off-camera flash cord.

I’ve always hated fill flash, although I use them when I need to. I just don’t like the effect. I had a band I had to do promo shots for that there was just no other way…they loved the shots but I don’t.

What kind of camera do you have? Point and shoots today are FANTASTIC and just get better and better. But…and it’s a cute but…DSLRs still take the best pics. I don’t care how good p&s cameras get…knowing how to program a camera is always going to be crucial. A camera simply cannot adjust on its own to every situation. Today, for example, I shot for about an hour, and I was constantly adjusting my settings. Yes, most point and shoots can be user-adjusted manually, but they still aren’t up to the quality of great DSLRs.

I have a Canon 40D. My main lens is a 24-105mm L IS. It’s a great camera and about the best lens you can buy in that focal length.

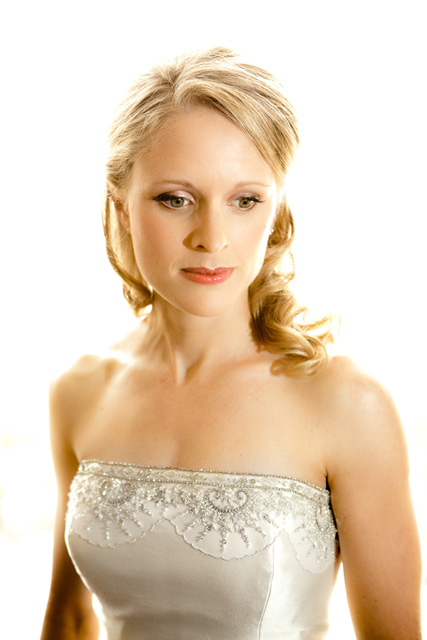
My pictures come out like the ones you linked to.

If you have a good DSLR and a great lens, the next step is learning about exposure, which is a combination of: aperture, shutter speed, and ISO. White balance is really important, as well as metering. In real estate, the three most important things are location, location, and location. In photography, it’s exposure, exposure, and exposure.

I’ve taken well over 100,000 photos, and I’ve analyzed them all. I keep my camera on burst mode so that when I shoot a pic, I take a minimum of three, but usually about five shots. When I do that ten times, I’ve taken 50 photos. Of those 50, maybe one or two will be of the quality of the photos you’ve linked. One in a hundred is better than those.

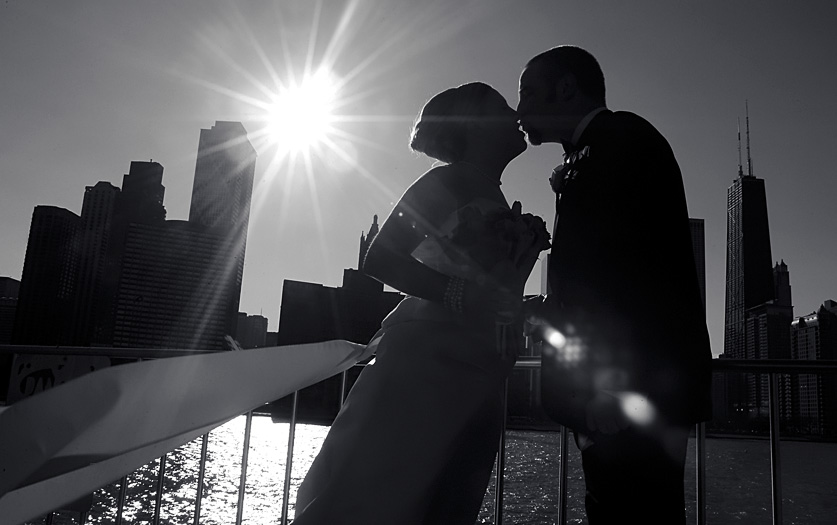
Today, I shot 850 pics. Of those, I edited 106. Of the 106, maybe…five were spectacular “why aren’t I a pro?” pics.

Editing is the final step. Most people use Photoshop. I use The Gimp, which is free. What I usually do to each photo is: adjust color with levels, sharpen with unsharp mask, and adjust the contrast. Sometimes I get tricky and dodge and burn dark/light areas. Sometimes I use a lot of layers to rescue an over/underexposed photo. Sometimes I use filters for a desired effect.

Ugh…I’ve turned into a camera snob :slight_smile:

Used properly, fill flash should not draw attention to itself. It shouldn’t look like an “effect” at all, unless that’s what you’re going for. Same with flash of any kind. Fill flash is an extremely important technique and, among other reasons for using it, it’s to reduce the contrast level for an image so it looks more like how you see it, since film and digital sensors have a much lower dynamic range than our eyes. If I must use on-camera fill (I generally use it off-camera as much as possible, which makes it completely unnoticeable if positioned well), I dial it down anywhere from 1 - 2 1/2 stops. The point of the fill is to just bring enough of the shadows out to get a high contrast image to squeeze into the dynamic range of film or digital sensor.

The main difference between P&S and DSLRs is the size of the sensor. Yes, there are other differences, but sensor size is the main determining factor of image quality, especially in low light and when looking for shallow DOF. Until we get large sensors on P&S cameras (and a few models are getting better) there’s going to be the disparity.