Photoshop challenge - too much light on skin - can it be fixed?

here’s a photo I grabbed off the web.

typical problem - way too much light obvious white streak on the leg, sides of the arms
this is a spam photo and some idiot may have badly damaged it. But I get the same problem with my own outdoor photos. washed out skin tones and that contrast flare. I’m using the spam photo as an example because I can’t post a personal photo here.

Is there any way to boost the skin tone? and reduce the contrast flare?

heres a quick fix I tried - reducing brightness by -30 contrast +10 and saturation +15
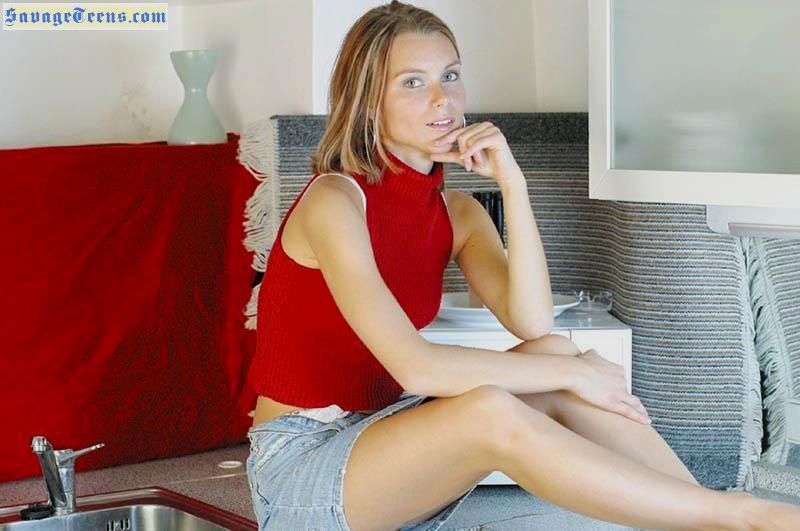
helped some. the jean material is more blue, flesh tones a little better. but the photo still looks bad. still have that long white streak on the leg. flesh tones very washed out. the photo just sucks. :wink:

tried sharpening and geez, theres a lot of ugly artifacts in that photo. gave up on even trying to sharpen this one.

sometimes adjusting using Photoshop levels I get better results - boost the mid range between 100-180. set the low point at 35 to boost contrast, cut out the high pixels above 235. But ultimately the photo isn’t all that much improved.

maybe with Curves? I’ve never had any luck with photoshop curves. how that tool works eludes me.

photoshop is supposed to be this powerful tool. Can anyone fix this example and explain how they did it?

its such a common problem. I think a lot of people would appreciate learning how to fix it.

open both photos in tabs

switch between the tabs. you’ll see the obvious changes I made. I’m on the right track, but there should be a way to restore those washed out skin tones.

well I guess everybodys shy tonight.

here’s my completed attempt. I learned Photoshop 16 years ago and use the tools I know the best.
There are newer tools in CS6 I’m not familiar with.

big improvement but I know the professional graphics people could do much better. that contrast glare is still on her leg. Not sure if that can be fixed without literally using the brush to paint over it.

photo had much much too much lightness. setting the low level mark at 50 darkened it and really helped with contrast. adjusted the mid point level just a little to darken the flesh tones.

skin was a little greenish. shifted hue just a little and raised the saturation to intensify colors.

levels layer
50 .86 255

exposure layer

  • .11

hue/saturation layer
hue -4
saturation +12
lightness -2

Sharpen Edges

Cropped

Looking at the finished photo that I did. Face is a little red. But it was a calculated trade off. Getting rid of the greenish hue on the skin was more important. Color on the shoulder and legs look just right. Face is a little red. <shrug> Photoshop never comes out perfect for me.

That’s what separates the graphic artists from the rest of us. We do this stuff occasionally. They do it every day they go to work. They get results that can be blown up and published in a magazine.

I give myself about 15 to 20 minutes per photo to edit. Anything more than that is too tedious and I got better things to do. I typically have a batch of 10 to 20 photos to touch up. I won’t be painting pixels one by one. LOL don’t have the patience or free time to do that.

You should probably have played with the exposure settings in the Raw dialog box.

I’ve heard of Adobe Camera Raw or ACR Its part of CS6. JPEGS can be opened in it. I need to read through some tutorials on editing in camera raw and see what the advantages are.

Talking about the newer tools in photoshop are really the reason for this thread. Help older users like me learn the new features and what advantages they offer compared to what we learned ten years ago. Photoshop has always been quite powerful and it takes awhile to try and learn all the tools.

Not commenting on this particular photo, but I get a lot of mileage out of layers and masking. Easy to adjust contrast etc. on a particular part of the photo. Mess it up? Just delete that layer and try again.

I always fix overexposure problems by going to Image -> Adjustments -> Shadows/Highlights. It’s much more selective than the normal Levels dialogue box in correcting over or under-exposure in those elements. For some reason my Photoshop always defaults to brightening up shadows while leaving highlights alone so the first thing you have to do is play with the Amount sliders under each to have it do what you want. After Shadows/Highlights I usually still use Levels to tweak photos a little as a whole.

Looking at that photo, this method should be good enough as it’s quite within the ballpark (there’s no pure white spots). However I’ve dealt with photos that are very far gone and in those instances you often have to do some heavier editing with multiple layers, healing brushes, and so on.

As Macca26 alludes to, there are two levels of fixing such photos. One is to bring all the curves into ranges that give a more normal look, but this can only be done when the image data is there to “bend.” If the shadows or highlights are completely blown out, no image data lurking in the black or white patches, the only fix is to “repaint” the lost areas. The first requires good mastery of Photoshop’s various curve and level tools. The second requires being something of an artist.

I’m assuming Photoshop has an easy way to see when the levels are blown (i.e. that color is white or black, and there’s no hidden color info to be tweaked)?

DXO Optics has a button to press that identifies where the highlights and shadows are blown out- it’s kind of a nice thing to do up front to see whether it’s even worth the trouble.

No…I just use my eyes. You can just see if a photo is blown out by looking at it - it’ll affect the whole photo dramatically if you’re to the point of pure blacks and whites involved. Of course, this doesn’t matter if you’re getting paid to fix it regardless of how good or bad the original photo is. It can be blown to hell and back but if you’re paid to fix the wedding photo, you’re paid to fix the wedding photo.

I guess you could use the eyedropper tool to see the color values but I never bother.

If it’s a jpg with blown out to white overexposure, you’re screwed. There’s nothing there to adjust. At best you can use tools to copy textures from non-overexposed areas and copy them into the blown out areas and other tools to sort of blend it together to look ok.

If the image was in RAW format, you’d have a much better chance of fixing the issue.

Drag brightness and contrast around, way up and down. If there’s data in the areas, it will show up. If they stay blanks of any shade, them pixels is gone baby gone.

I agree with GaryM- make several duplicates of the base layer, play with adjusting just the trouble spots,and mask out the rest because you typically won’t want to apply the specific adjustments needed to correct the overexposed spots to the res of the photo. Last resort, use another photo of a person with similar complexion and lighting and steal some skin from it to touch up the overexposed spots.

Image > Adjustments > Curves, click on “show clipping.” Or open it in Adobe Camera Raw and click on the arrows to the left or right side on the top of the histogram.

You’ve all given me quite a few good ideas to look into. I’m committed to studying Photoshop again and learning the new tools. I did that 8 to 10 years ago. I had 4 different books on Photoshop that I went through. What I learned back then still works but the newer tools will probably be faster to learn and maybe even do a better job.

thank you for your help and suggestions.

When adjusting levels, hold the alt key as you work the sliders and you’ll see when you’ve reached a good spot with full range of what’s there.

The problem with using lightness settings on the entire image is that what works for the skin could make the rest of the image look chunky. You need to isolate certain parts of the image.

This method involves a lot of tedious work. You could try duplicating the image in a new layer on top of the original, then play with Filter>Blur to disperse the intensity of the light. Then try adjusting brightness, contrast, levels etc to get the skin tone you want. Don’t worry about screwing up the rest of the image. Just concentrate on the skin.

Next, do a lot of erasing on the top layer. Erase the hair, eyes, mouth, outline, and background so that the sharpness of the original shows through, but the blurred skin stays. You can also accomplish this by using one of the selection tools, draw regions to be erased, then hit delete. You can soften the edges of your eraser tool so it won’t look like a stencil cut.

You can also duplicate the original into a new layer and do different things to the computer on the right, then erase the rest of the layer. You can’t really do one thing and fix everything in the picture. By duplicating into layers, you can fix individual parts of the image and leave the rest alone.

Save the layers in a PSD file, then flatten the layers and save as JPG. If you want to change it later on, use the PSD.

One more thing: The pen tool is my absolute favoritest tool in Adobe anything. It requires practice to learn how to use, but it’s really handy. You can use it to outline the girl, go the Path pallette, convert to Selection (new), and copy the girl and paste her as a new layer. You can do the same for the other components. That way, you won’t have to do as much erasing. You can blur the girl image, then erase just the hair, eyes, mouth etc.

The way I do this sort of adjustment is pretty straightforward. I prefer to do it in Lightroom. I use the local adjustments brush set to lower the highlights and exposure, and maybe add a little warmth and/or saturation to it if the burning ends up looking too gray. Easy peasy lemon squeezy. You can also do it similarly in Filter > Adobe Camera Raw. That gives you much of the same editing functionality that Lightroom does.

Within Photoshop, you have the option of using the burn tool. That’s good for quick & dirty methods of darkening areas, and I do that when I just want a quick, light burn or dodge. The more usual workflow is to duplicate the layer (so you’re working non-destructively.) Click on the background layer in layers palette and hit command-J (or control-J on Windows.) I then use curves and/or highlights/shadows to get the part of the image I’m focusing on toned how I want it. I ignore other parts of the image. It’s okay if the rest looks like crap, we’re not going to use that part.

Then, making sure my top, adjusted layer is selected, I hit the mask tool in the layers palette, holding down option (Mac) or alt (Windows) to creating a new mask filled with black. Your bottom, unadjusted layer should now should be visible. Select the mask you’ve just made by clicking on it in the Layers palette. Making sure my foreground and background colors are set to black and white respectively (hit “D” to set the foreground and background at Default black and white, then “X” to flip them so white is foreground and black is background.) Hit “B” to select your brush tool, and pick an appropriately sized brush with hardness set to 0% (so a soft brush with fuzzy edges). Paint over the parts of the image you want to darken. You may want to set your flow lower if you want to paint in the areas incrementally. So what you’re doing here is letting the top, corrected layer, show through in the parts that you are interested in darkening. If you screw up, just hit “X” to switch the foreground and background colors, and your brush will essentially act like an eraser. Since you are working on a mask, the pixels underneath are not altered–you’re just controlling how much of it is showing.
OK, writing that out, it seems a lot more complicated. Personally, the highlight in the OP’s picture doesn’t really bug me at all. But that’s how I’d go about doing it to darken it. Similar steps can be used to lighten areas of a picture, selectively saturate areas of a photo, etc.

I made a quick video of my basic workflow as I think it might help more if you see it done rather than read about it. Please excuse the crappy audio. My Macbook’s internal mic is very noisy for some reason.

Of course, in Photoshop there’s a gazillion ways to skin a cat. I’m just outlining the basic idea above of using layers; if it’s still too much of a highlight for you on the arm, you can go in the correction layer and darken it even more. I just realized that I could have also done it as an adjustment layer, rather than actually copying the layer and playing with it directly. (Some of my workflow is stuck with how I used to do it on older versions of PS that didn’t have adjustment layers.) The same idea applies if you are using adjustment layers.