Yep! Occasionally I’ll hear people say things to the effect that filament printers can only make junky plastic crap. And while that’s essentially true, it’s missing the point. I’ve made a ton of specialized parts for around the house. They’d be some junky 50 cent injection molded crap if they existed, but they don’t, because there are a tiny number of people with the same need. I designed and printed a holder for the funnel on my Aeropress coffee maker, a stand made for my specific phone and the angle I want to see it at, a hook to hold my headset under my desk at the spot I want it at, and so on. Some of these things exist in universal versions, but they’re worse because they don’t fit my particular needs exactly.
Revisiting this a bit, I was hoping the photogrammetry apps for Android might have improved since I last tried them, but they’re still pretty terrible. I went through this list, and found that Qlone is the only free one for Android. It’s really quite terrible. I tried taking a model of my computer mouse, really a pretty simple model, and the result was horrid.
I don’t really understand why the apps are still so bad. Photogrammetry has been researched for ages, and with the quality of modern phone cameras and the processing power available, it should give very good results. Weird that it’s still so bad.
@Dr.Strangelove, I want to thank you again for answering in so much useful detail. You were a huge help in this decision. I just retired and this is a great thing to do during the winter and during a pandemic.
You are very welcome! It is definitely the right kind of hobby to putter around with in retirement.
I’m sure you’ll have more questions as you get running, and you may well find some solutions to problems I faced as you play around with it. I look forward to your results!
My current project (which will probably continue to be my current project for the next year or more) is a makerspace tuba. Not all of it will be 3D printed (that would be horribly cost-prohibitive), but the valve assembly is. I found that the filament printers at the library, even at high-quality settings, tended to “swell” pieces by about 0.2 mm (that is, solid objects get bigger, but holes get smaller, which matters if you’re making one piece to fit into another piece), so I had to compensate for that in the design. You’d think that that compensation would be built in to the device drivers, but…
And totally agree about the odd little odds and ends. I had a folding bike that had a little plastic latch piece that failed, and I was able to print a replacement for that, and a friend had some drawers that installed in a kitchen cabinet that needed a plastic doohickey at the back to attach them, but they only had one instead of the four needed, and I was able to make some of those, too.
$25/kg is also cheaper than the filament I’ve seen, which seems to run about twice that. I was afraid it’d turn out to be much more than that.
That’s a neat-sounding project! But you’ll have your work cut out for you with the precision you require.
It’s not possible to build the compensation into the drivers for a couple of reasons. First, the machines themselves operate on gcode, which is a very simplistic command language (but almost universal for any CNC machine). It entirely boils down to “move the head to this coordinate”, where even the filament extrusion is a coordinate (i.e., as you move the head 2 inches in +X, move the filament +0.25 inches). There’s just no opportunity in there for compensation.
Second, it’s all dependent on factors like the exact material you use and the temperature (the plastic has a high coefficient of expansion, and has to account for this). The machine obviously doesn’t know what plastic you’re using, so this has to be part of the slicing software.
Fortunately, this stuff is settable in the slicing software, but the settings can be a little esoteric. Are you using Cura? And a recent version (latest is 4.11)? If so, try enabling the advanced settings, and searching for “wall”. Some possibly relevant settings:
- wall line width
- outer wall inset
- outer wall flow
There may be others. Cura is free, so you might also try downloading it at home to play around with.
A resin printer will do better here, at least in XY. It doesn’t need to compensate for material expansion, squishing, etc. It should pretty much just match what’s on the build plate.
Thanks for the tips!
I’m glad to hear this part. That alone would make it worthwhile to me.
So you could print more than one figure at a time? Do all figures have to be a single piece or can I print separate torso heads, arms and legs for different figures at the same time as long as I had the design?
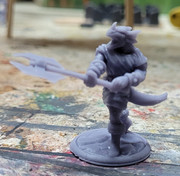
The pieces you showed above, is that how they looked right after printing or do you have to do filing and sanding also?
I’m not clear on what the baths are for. Could you elaborate a bit on that?
I looked at Thingiverse a bit and I’m amazed that stuff is free. People sell designs like that on ebay and Etsy for a couple bucks. I would also like to make my own, what program do you use for design? I see there are several free ones like FreeCAD, are they any good? (I see the Dr., recommended Fusion 360, which at first glance looks free for thirty days) Can you recommend a good forum to read up a bit on tips and ideas from users?
This sounds great. Is your first thought now when you encounter a problem “Hmm, I wonder if I could use the 3D printer for that?” ![]()
Agree, and thanks to @What_Exit for his thoughts also.
This thread is pushing me towards getting into 3D printing. The only thing I’m a little iffy on is I would want to put it in my apartment in NY, where we usually spend most of our time and plan on living there full time in a few years. While we do have a spare bedroom, I’m a bit worried about fumes as my wife has asthma and I don’t want it to be a problem for her.
My little bit of design for 3D printing has mostly been using FreeCad. I just downloaded FreeCAD-0.19.3-WIN-x64-installer-2 this morning in prep. It has been over 2 years since I was printing on the filament printer. So right now I have to get myself back up to speed before I start making or modding prints.
Besides FreeCad, I used Autodesk_Meshmixer to fix the .stl for the printer. It often took 3 programs to get a print to work.
I did have some prior auto-cad experience back in the mid-90s.
As to printing more than one object at a time, I had some success with that on the filament printer. I printed 6 buttons, 4 4-sided dice, 4 parts for the shower, I think I printer 6 snowmen at once and 5 worked and one looks like Calvin made it.
I’ll eventually see how that goes on the Resin Printer. It should be here today.
I’ve printed a grid of 9 meeples at a time for a game concept on my Snapmaker filament printer.
I modeled those in Blender.
Yes, however many you can fit on the build platform. Unlike filament printers, resin printers don’t slow down as you add items. The print time is purely proportional to height (and the print settings, like wait time per layer). The Elegoo Mars has a platform size of ~4.5"x2.5", so you can fit a decent number of small models in there.
You can definitely arrange the pieces however you wish. In some cases it’ll be better to do separate prints and attach them later if the support structures would get unwieldy otherwise.
I think you can download the software for free–the Elegoo printers use Chitubox. You can import the models, arrange them on the build plate, add the supports, do the slicing, etc.–just to see how that part of it works. It doesn’t need a printer to be connected.
The Dwarf is as he came out of the printer (aside from the washing and curing). But you can see that he’s a fairly “compact” model, without a lot of extra complicated bits. I think there was some support under his arm that easily snapped off.
Other models are not so easy. I printed one that had a long, spiky tail that helixed around the model. That took some work due to all the extra support structures needed. That support doesn’t always come off cleanly, and might need some filing.
Well, when the models come out they’re still covered with the goopy resin. It’s basically liquified plastic and is quite sticky and messy. It needs to be washed off, and at least for the traditional resins, you need an alcohol of some kind. And to waste less of it, I don’t just let the alcohol run down the sink. The first bath gets most of the stuff off, but gets very cloudy with resin and doesn’t do a perfect job. The second bath stays cleaner and does a better job, and the third bath stays cleaner yet. So far three has proven sufficient for me.
There’s a persona//hobbyist version that’s free forever, with some minor limitations. If you can’t find that version, let me know and I’ll dig up a link.
To be honest, no! I still find it difficult to think in those terms. I’ll be browsing Amazon for some doohickey… only to realize I could just print one. I should have thought of the printer first, but it doesn’t always work that way. I’m getting better at it, though ![]() .
.
That’s funny, Fusion 360 appears to be the new version of Autodesk that I was using. It looks like Autodesk_Meshmixer might be the fully free version you were mentioning.
Autodesk is the company; they make a bunch of products, including AutoCAD, Inventor, and Fusion 360.
Fusion 360 is targeted at the entry level commercial market; it’s definitely suitable for professional work but it’s not quite “industrial grade”. That’s what Inventor is for.
Here’s a link to the hobbyist version of F360:
You have to renew it every so often, so it’s a little annoying, but I can’t complain at all.
Note again though that I use it for mechanical type stuff. It’s a CAD program (and some other stuff). It’s not suitable for building miniatures, etc. For CAD though, it’s awesome. Parametric design (ask if you want to know more!) is an absolute revelation in design.
Printer is setup and printing the test print from the included USB FOB.

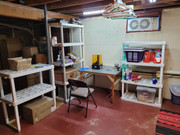
Here is the setup as it slowly prints.
My first test print will be a 48 minute test of 6 4 sided dice at once.
The procedure for getting things printed at the library is to email them an STL file and specify a color, and then come in about a week later to pay for it and pick it up. On the positive side, this means that I don’t have to futz about with settings. On the negative side, though, it means that I don’t get to futz about with settings. Although… Maybe they would let me send in the gcode file? Anyway, I’ve managed to get the tolerances I need so far, albeit with an annoying amount of trial and error.
I’m already getting to that point, and I don’t even have my own. But then, half the time, I stop and think “No, wait, it would be much easier to just cut something out of wood on the bandsaw”.
Oh, and for design, I use Tinkercad (free, and now owned by Autocad as well). It’s not as good for “sculpting” organic shapes, and of course it’s more limited than a professional program, but I’ve figured out lots of tricks for it to get it to do the things I want from it (fortunately I mostly don’t work with organic shapes).
Excellent! Looks like a decent setup you’ve got there. Your table should be plenty of space for the post-processing.
Got it. That makes sense, since even the filament printers require some handholding to get right, and they probably don’t want randos messing up their machines with rats-nest prints and such. Maybe they would accept g-code given that you’ve been interacting with them for a while. Or maybe they’d accept a Cura project file–that way, they could do a basic inspection before printing.
By the way, I see you mentioned earlier that $25/kg is half the price of the filament you’ve seen. That’s not true: most filament is in the $20-25/kg range; less if you buy bulk. Of course, you can pay more with special types like metallic or glow in the dark finishes, but for the basic colors in PLA it’s all pretty cheap. Maybe your library is charging more for machine/personnel expenses.
If you have the space, and you really expect to do a lot more printing, I’d really suggest just buying one. You can get very decent ones for a few hundred bucks. I have a couple from Monoprice that work well. This looks pretty solid for $240, for instance:
https://www.monoprice.com/product?p_id=34438
Looks nice. It doesn’t take up any space at all. Did you put the window fans in especially for the printer work? Looking forward to seeing your results.
I’ll have to check my local library. It never occurred to me that they would do something like that there. Maybe I’ll try doing a couple of designs of my own and have them printed elsewhere, just to get a feel for the software. Thanks.
Could I do something like my own 28mm buildings with this?
Thanks again to everyone for answering all my questions.
I had to clear some shelves out of the way to have easier access to the window for the fan. I’m adding a shelf next to the window for the fan to sit on and maybe some other stuff.
First prints are happening, I’ll have some pictures by tonight.
Here are the first prints, successes and fails.
Dragonborn Warrior & a Dryad. The detail on this printer is amazing. {click to expand of course}

- So I’ve learned how to slice with the software. I had to lighten the supports.
- I can print multiples at the same time. Very cool. Figures take about 2 hours but easy to do 4 at a time.
- Once printing is done, I don gloves and carefully remove the printed items.
- I then swirl these in water until mostly clean.
- I fish one out and use an old toothbrush to gently remove more resin residue. I then wash in fresher water (both are 1 qt Chinese Soup containers). .
- Before curing, I take to the craft bench and carefully remove the supports.
- I then place them on the turntable to complete the curing under the UV lamp.
- They go from rubbery and soft to hard.
Some great looking prints you’ve got there! The Dryad especially looks like a tough print. As you found, fine tuning the supports is a key part of the process, but it looks like you’ve already made good progress.
I will definitely have to give the water-washable resin a try. I have an ultrasonic cleaner that I suspect would do a good job here, but it’s too much of a pain to use with alcohol. Water would make that much more viable.
Your first fail with the D4s is pretty minor in the grand scheme of things  . You’ll probably have a few more (I did, at any rate). Occasionally the prints don’t adhere to the base properly, and pop off completely or partially… weird stuff can happen. Well, all part of the learning process. At any rate, great job on your first prints!