You can find the center with a studfinder as well. Use it to find the edges, mark with a pencil, and then drill halfway between those marks.
Are the interior walls in houses in your area also build of brick and breeze-block? If so, how do you run electrical conduit, plumbing pipe and heating ducts?
Excellent advice from Cheesesteak. You need to be as close to center as possible, on that center fastener.
I would hazard to bet that the hole in the center support is probably not large enough to permit the use of a 1/4" lag bolt. Did the unit come with any fasteners? If it did, what kind and size are they?
Colophon
What is a breeze-block? ![]() If I had to guess, I would say that you’re talking about a large masonry block, usually 6"-8" tall x 12"-16" wide x 6"-8" thick. It has two hollows that run vertically. (cinder block is what we Yank’s call it ;))
If I had to guess, I would say that you’re talking about a large masonry block, usually 6"-8" tall x 12"-16" wide x 6"-8" thick. It has two hollows that run vertically. (cinder block is what we Yank’s call it ;))
Am I correct?
Yes. The name is also sometimes applied to concrete blocks that don’t have the hollows.
Dewey Finn, yes the interior walls here (UK) are often made of breeze block, although new-build houses do tend to use plasterboard (i.e. drywall) for many internal walls.
In my house, built in the 1960s, the external walls are brick cavity construction (two one-brick thick walls separated by an air gap) and the interior ones are breeze block. They are then plastered and painted.
To run cables and pipes, you chase out a channel in the brick using an angle grinder or similar tool, and then plaster over it. Fun stuff. NB the shoddy plastering wasn’t me, and it’s all hidden behind wall cabinets and/or tile anyway… ![]()
PS You can also see the hole for the cooker hood, showing the two layers of brick. That was fun to drill, too.
Out of curiosity, why is it called breeze-block? They don’t lay the block on it’s side so the breeze will blow thru the holes, do they? ![]() ;)
;)![]()
Looks like you had tons of fun! :eek:
How did you make the hole for the vent pipe? ![]()
Looks like it was made with a hole saw or coring machine.
Just in case Mr. Murphy is at work…are we sure that his wall isn’t tiled? A bit more difficult if so. (I know people with at least one kitchen wall partially or fully tiled.)
Kind of curious myself. ![]()
Hopefully, No Wiki Cites will check back in and give us an update on how the job went. ![]()
“Breeze” is apparently an olde-timey word for “ash”, so it’s the same reason they’re called “cinder blocks”.
To be fair, I didn’t do all the chasing out for the new cabling, I let an electrician do that part, but I did drill the hole for the vent. I used an SDS drill with a diamond core bit. It took almost an hour of drilling, above head height, and those drills are heavy. Fortunately I had a friend helping out so we took it in turns to drill so our arms didn’t fall off.
It looks like this now. ![]()
Looks good, Colophon! ![]()
Especially the tile backsplash. ![]()
UPDATE: The rack arrived, but the instructions specify that the side two bolts should be in the stud, and the top center one should be in the drywall with an anchor.
Ignore?
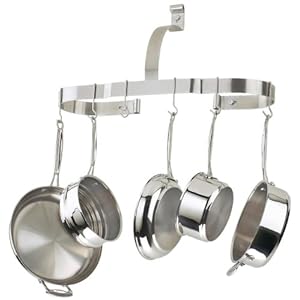
I’ve been mulling over this for a while. Looking at this three-quarter view of the same sort of rack, which gave me a better idea of how the top strap was attached, it seems like the manufacturer’s instruction to attach to studs through the side holes would provide more overall strength and durability.
My reasoning: the top strap appears only intended to prevent the outermost curve of the apparatus from sagging, rather than being a primary support feature. It doesn’t appear that it would be called on to bear much weight unless the integrity of the entire rack structure failed. So long as the points where the circle meets the wall don’t bend, you’re better served by distributing the weight of the loaded rack across two widely-spaced points.
Also, it would seem that, if you attach only the top strap to a stud, you’ll compromise the thing any time you remove a pan from it. When you take a pan off the left side, for example, the right side will be heavier, and with a single sturdy attachment point, the rack will “see-saw” a tiny bit. The imbalanced rack will exert a slight upward force on the left screw and a downward force on the right. Over time, those see-sawing forces will enlarge screw holes that only go into drywall, leaving you with a wobbly rack.
Hope I’m making sense. Tell me where I’m wrong. Might be moot, since the OP has probably installed the rack by now. heh.
I see the point that you’ve made, and it does seem to make sense. The picture the OP linked to didn’t give any dimensions.
Based on the dimensions of the unit, which seem to indicate that the two lower holes are 16" apart, would indeed infer that those points should be fastened to studs.
But I’m going to stand by my earlier recommendation of attaching the ***center support ***to a stud. The two lower/outer ones will be sufficiently strong, as long as the proper fasteners are used. For that I recommend using 3/16" (minimum) or (preferably) 1/4" toggle bolts.
Seeing as how the rack only comes with six hooks, one might assume that the amount of weight that will need to be supported, won’t be all that much.
Which is probably true, if your just going to hang some sauce pans, pots or light weight frying pans, then a toggle bolt in the center support should be sufficient.
A couple of cast iron skillets hanging on that rack, (especially, if placed towards the middle) would be a different story. ![]()
(That’s my reasoning for the center support needing to be fastened to a stud.)
As I suggested up thread, take all of the items that you anticipate hanging on that rack and stack them up. Lift that up, and that’s what I would use as a reference for how much support you will need. ![]()
I stand by my original recommendation. ![]()
best mounting, for heavy loads, is blocking installed in new construction or remodeling or into studs. if this doesn’t exist then i like mounting a 1/2 inch thick board spanning studs, stained or painted, to mount the object onto.
a caution in using toggle bolts in drywall (plasterboard, gypsum board): the paper on the board gives it strength in unbacked (against air or hollow wall cavity) areas. people think tightening a toggle bolt as hard as you can is the best. that breaks the paper in the back, that can lead to a failure of the wall at that spot and the toggle bolt can eventually get pulled out the front. tighten until snug not until you can’t tighten it anymore.
(bolding mine)
Excellent advice johnpost, spot on sir! One more thing, if I may. ![]()
When making the hole for a toggle bolt, try not to “break out” the back side of the sheetrock. I’ve seen a lot of failures due to someone just hammering a screwdriver or some other object thru. Not good, as that causes the sheetrock to spall out on the back side, greatly reducing whatever strength was there. ![]()
(I like your idea of a 1x4 attached across adjoining studs method. Route the edges, a little stain, a coat of varnish and it’ll look great.)![]()
I bought the oval version
Product Dimensions: 28.9 x 10.4 x 5.9 inches
I think I’m going to get a handyman for the job since I dont want to be buried under Le Creuset.
FWIW, I would mount that one exactly the way that I suggested for the other model. ![]()
If you’re not inclined to test your constructive abilities, then yes, a handyman wouldn’t be a bad idea. ![]()