I am thinking about changing the front brake pads (and probably rotors) on my wife’s 2001 Honda Accord. From a purely mechanical standpoint I know how to do this. Remove the caliper, reset the piston, change the pads/rotor, replace the piston. The rears are a little more complicated, but the fronts seem pretty straightforward.
That said, this is something that, if done improperly, can kill someone. Brake failure is never a good thing. So, is it something I should leave to the professionals, or am I just sweating it because I’ve never actually done it myself?
I’m interested in doing it myself for two big reasons: first, it will save me a fortune in parts and labor, and second, I’d like to learn to do it so I don’t have to depend on anybody to do it for me in the future as I am an inveterate tinker/amateur shadetree mechanic and I like to get my hands dirty.
So, tell me it’s OK, try to dissuade me, offer advice, whatever. Thanks.
Replace the caliper, you mean. I say do it. The main failure point would be if you damage or loosen the brake hose. Take good care not to mess it up. There are videos on YouTube ( How to Replace Brake Pads on a 1998 - 2002 Honda Accord - YouTube ) that show how to do it. I have owned 21 cars and have never hired any brake work on any of them. Just be careful and you’ll do fine.
It’s not that hard, if you’re handy, you can do it yourself, from beginning to end in probably about two hours.
My suggestion would be that you find a friend that’s changed front brakes before and have them help you out the first time. If for no other reason it’s REALLY helpful to have an extra set of hands. I usually try to have some bailing wire or a milk crate within an arms length at all times when I do it. It’s nice so when you’ve got the caliper off and your realized you left the new pads in your trunk or you that tool is just out of reach you have something to do with it other then trying to balance it somewhere or let it hang from the hose (don’t let it hang from the hose). Having someone there is nice to help you out there.
Then, there’s just the obvious reasons. I’ve changed brakes on several different models of cars, on 70’s, 80’s, 90, 00’s. They’re all a little different but close enough that I can figure it out. Some have pins that get hammered out, some have bolts in the front, some have bolts in the back etc…Your friend that’s done this before can likely point out the ones you need to remove and can walk you through what you need to do so you don’t have to wash your hands after each step so you can pull up youtube on your phone.
It’ll also be good to have another person with a working car for when you need to run to the store to get the odd sized ratchet or bigger C-Clamp or the brake fluid you forgot to grab.
Having a friend is a real good idea. It is a big help if he has worked on brakes before, but just having an extra set of hands is a good idea.
As Joey P also said, bailing wire (I use coat hanger wire) to hang the caliper to keep you from letting it hang from the brake line.
Inspect the rubber brake line. Any sign of rubber deterioation or swelling means they need to be replaced.
I think the rotors on the Accord are held on the hubs with big phillips head screws. You may need an impact screwdriver to remove them. If you have trouble removing them, consider replacing them with new ones and put anti-sieze on them.
Before you compress the pistons in the calipers, remove some brake fluid from the master cylinder. If any fluid has been added over the years, you run the chance of overflowing the M/C and making a mess.
After replacing the calipers, flush/bleed the system untill you get fresh fluid to come out at each of the calipers you worked on (although not a bad idea to flush the whole system). It is recommended to flush your brake system every 2-3 years, but most people do not. Brake fluid absorbs water and degrades the whole system. If you have antilock brakes, be sure not to let the master cylinder run out of fluid during the flushing becasue if you get air in they system (from letting the master cylinder run dry), it will keep your brakes from working and you will probably have to take it to a shop to get it fixed.
What they said. And while getting my hands dirty bothers me not at all, I always wear gloves for brake jobs. That black powder combination of rubber and brake pad dust gets on everything you touch.
There are some folks who take the shortcut of just slapping new pads on, and putting things back together. I recommend pulling the rotors and having them turned. This give you a new, fresh, and parallel surface for your new pads. Better braking all around. You should find an Autozone, NAPA, Pep Boys that has a machine shop will turn them for about 10 bucks a rotor. They’ll also have a tool to rough up the surface a bit for better break-in and performance.
This way, you know you won’t have any warping or hard spot issues that will make you take it all apart the next weekend and turn the rotors then!
Of course, this assumes that you’ve measured the rotor thickness and have enough “meat” to be in spec once they’ve been turned. I don’t know that anyone will rent you a micrometer, but Harbor Freight has a couplethat will work that are inexpensive. You plan to do your own brakes all the time, right? $20 is a bargain for a mic, and you’ll always have it.
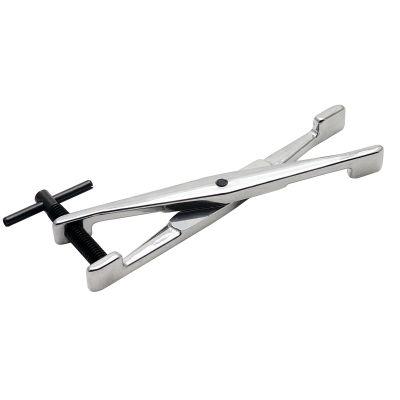
Rear disc breaks are actually a bit more involved, but not much. Where the front caliper piston can typically be pressed back into the caliper with a C-clamp, big-ass pliers, or a specialty tool like this(cheap), or this, or this, the rear caliper piston ***has ***to be screwed back in with a special tool.
Generic front brake pad instructions. You can probably find detailed instructions on a Honda forum. Maybe even with pictures or video. Do a little searching as prep. You will want to find out which size sockets, torx heads, etc, you will need.
Jack up and support the front end of the car. Remove wheel.
Take your cell phone or camera and take pictures as you take things apart so you can tell how they go back together. I highly recommend this. Particularly how the pads are in the caliper, one side goes one way and the other another way. Pay attention to the position of the little metal ‘squeeler’ tabs on the pads
Using a turkey baster, suck out some of the fluid from the master cylinder. Leave cap off. If you don’t remove fluid the master cylinder will overflow when you push the caliper pistons back. Wrap a rag around the bottom of the master cylinder just in case.
Using a large C clamp placed on the brake pads, depress the caliper pistons.
Remove and support the caliper by hanging it with wire or twine or placing a small box or block under the car for it to sit on. Do not stress the brake hose by letting the caliper hang.
Remove and replace the rotor, it should come right off once the wheel and caliper are removed. May need to be tapped lightly.
You can get away with not replacing the caliper and just replace the pads. But don’t do that, get either new or rebuilt calipers and replace them. As the pistons in your old calipers move out while the pads are wearing down the pistons can get exposed to dirt and moisture and become pitted. When you pushed the pistons back into the caliper to remove it that dirt and pitting went back in. This can cause a fluid leak. Any shop you take it to will insist that the calipers must be replaced, so that is what you should do. If it turns out that doing this kind of work turns you on then the next time you do a brake job you can move on up to rebuilding your own calipers, this time just buy them.
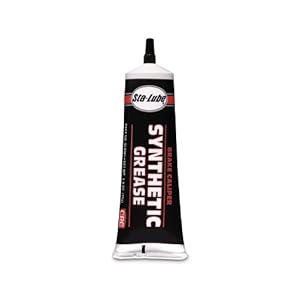
The slide pins on the calipers may need to be greased, if they do they should come with some high temperature grease. Ask about this when you buy them.
Try to remove the old caliper from the hose and install the new one swiftly so you don’t loose too much fluid. The new calipers should come with new little metal washers for the banjo bolts, use them.
Install new pads in the caliper, install caliper on new rotor. Torque bolt to specs. Put the wheel back on. Bleed the brake lines. You will need a partner to help with the bleeding unless you use a Mityvac hand pump to pull in new fluid, like I do. But they are a bit spendy if you are trying to save money.
Pretty easy huh? Plan for all day, I can do mine in about an hour now but I have a well equipped shop and have done this many times.
Now take your bloody knuckles into the house, open a beer if you can, and call a tow truck and have the car taken to a shop. Or celebrate your victory. Depends on how it all turns out.
I suggest changing your car’s pads, not your wife’s car. If there’s any doubt about what you did, it’s you who’s driving the car and can listen for any strange noises or strange behavior.
It’s a very straightforward job and becomes easy quickly, by the second or third time you do it on your own. The hardest time is the first, just because it’s new to you and is working on such a critical component – the worry factor of if you did it correctly. Having a friend is a good idea. Wish I’d done that years ago for more peace of mind (even though I didn’t need someone’s guidance), but once you do it you’ll really see how straightforward it is.
Turning rotors each and every time is a little overkill and makes the job more complex and take longer – remove rotors, bring them to a shop to have them turned, etc. But, some cars’ rotors tend to be more prone to warping, and also tend to wear more. You want to make sure your rotors haven’t worn too thin. Same goes for motorcycles.
Oh, and I believe that the current wisdom is to not turn the rotors. Either replace them with new rotors or if they are not grooved or worn too much to just leave them alone.
Here is a Youtube video of a guy changing only the brake pads on a 2000 Honda Accord using the same rotors and calipers. This is the very minimal way to do it.
No brake bleeding, new rotors or calipers. You CAN do it this way, but it isn’t what a shop would do. But it is quick and easy. Might give you an idea of how simple it is.
I would still do new rotors and calipers myself. But it depends upon your budget and comfort level.
New rotors and calipers is not just overkill, but is also wasteful. IANAMechanic and it’s been a while since I’ve done this job, yet I’d be surprised if it’s what car manufacturers recommend. Some might but I don’t think most do.
Yes, it can be overkill. Each person has a different budget, mine is pretty unlimited when it comes to car repair so I do my repairs with new parts and way before any problem develops.
Here is a better video from a forum where the OP should poke around. It shows replacement with new rotors and cleaning and re-greasing the calipers.
I think the issue there is that a lot of cars started coming with rotors that didn’t have enough initial thickness to turn. If you’ve got a car that you can turn them on, you still should. Although depending on what your local machine shop charges and what you can get the new ones for, it’s sometimes more cost effective for a DIY-er to just buy new ones anyways.
I will admit that on a couple of 4x4 trucks I’ve owned with “captured” rotors (where you have to take the whole hub/bearing assembly apart to remove them), unless the rotors looked really bad I’ve always just slapped on new pads and I’ve never noticed any particular problems. Although it’s not like those trucks were particularly well-mannered to begin with.
I agree with Jack, if you had normal wear on the breaks and the rotors are not damaged you will do fine just replacing pads. I work a large fleet and we have done it for years with no issues or complaints.
If the rotors are too far gone to turn, make sure to buy quality rotors. Many of the cheap rotors are made of inferior steel that meets just the basic requirements. These rotors wear quickly and warp rather easily. When it comes to things like tires, brake pads and rotors, it’s better to spend the extra money.
Also I highly recommend using a torque wrench on the lug nuts of the wheels. Your owner’s manual should state the torque required. Make sure to use a star pattern when tightened down the lug nuts (even without a torque wrench) and to go around twice first at about half torque then fully tightened on the second time around.
Are you stationed near Scott AFB? If so, I could help you.
I have always driven clunkers, and have changed brake pads, shoes, calipers, rotors, drums, etc. on dozens of cars.
It’s not difficult. A few tools and some elbow grease is all you need.
As a result, I have saved lots of money over the past three decades doing my own brakes.
A couple months ago I heard a coworker complain that the price of a brake job on his Mustang was $1200. It amazes me that someone with a bachelor degree in mechanical engineering would take their car in for a brake job.
Replacing brake pads on your car is not technologically difficult there are a few things I would like to point out.
Tools: you will need something to jack the car up with and a jack stand to support the car. DO NOT try to work on a car supported only by a jack. I don’t care how good a jack just don’t. Once you have it on a jack stand stand up grab the fender and wiggle, shove, shake and do everything you can to make the car fall off the stand. If it doesn’t then you can continue. You will need a socket and a ratchet to remove the caliper and if you are turning or replacing the rotor a different sized socket and probably an extension. Rotors should be checked for thickness to determine if they can be turned or must be scrapped. A rotor mic is used for that, you may be able to rent one. You will need a tool to compress the piston in the caliper, a LARGE pair of channel locks, a screwdriver or the parts store will sell a tool for doing this.
Look at the old pads are they worn more or less evenly? If one pad is worn more than the other attention must be paid to the sliding pins. Clean and lube them with high temp brake grease. Personally I would not replace the caliper unless I had a reason to. Reasons include torn or missing dust boots, leaks, totally frozen sliders or piston. I do not replace calipers as SOP. YMMV as I don’t live where they salt roads.
If you do go to replace a caliper it may (probably will) be necessary to undo the rubber brake hose where it connects at the strut. You will probably need a special wrench called a flare nut wrench to do this. Use a regular wrench and you run the risk of destroying the brake line. Not fun.
Buy quality parts. Cheap parts will give a shitty result.
While not hard don’t forget if you fuck this up you die.
Coloring mine. I assume you mean “reinstall the caliper.”
I do this for a living, and have for over 40 years, ASE certified master. I’m not going to list every wrong statement and every piece of poor advice above so as to rebut them individually, but you can count on what I have to say.
Before any disassembly, press on the brake pedal a few times to exhaust the power brake assistance, and note the height and firmness of pedal when pressed. It should end up about the same when you’re done.
Don’t remove fluid from the master cylinder reservoir UNLESS fluid has been added for some reason. If the level is at or near the “MIN” line, there’s plenty of space for the fluid that will get pushed out of the calipers when you reset them.
There’s no need to replace (or overhaul) the calipers UNLESS there’s a specific symptom that indicates a problem. If a caliper is leaking, or a piston won’t retract smoothly with normal effort, then replace them both. If all appears well, leave them be.
There’s no need to replace or resurface the rotors UNLESS they measure below minimum thickness, have deep scoring (over .060"), or are warped/uneven thickness. Official factory instructions say “Refinish brake discs only when they are scored or out of specification for runout or parallelism.”
It’s okay to let the caliper hang by the brake hose, but please don’t let it DROP so as to yank on the hose.
Make sure the caliper pins slide nicely in their bores. If they don’t, clean/lube as necessary. I recommend synthetic brake grease.
Grease all contact points between each pad’s metal backing and the bracket. The pads should fit into the bracket fairly easily. If they’re too snug to fit in by hand, check the shims (“retainers” in the linked illustration) and brackets for rust build-up and get them clean.
I highly recommend Wagner ThermoQuiet pads. With cheap pads you’re likely to have issues with fit, noise, performance, and longevity. If you don’t use ThermoQuiets, grease the contact points between each pad’s metal backing and the piston or caliper body.
After installing the pads and reassembling everything, but with the wheels still up in the air, press the brake pedal several time until you have firm pedal. Then spin each wheel by hand. Ideally there will be a fairly even “schuss” sound as the wheel rotates, though often it’s not totally even all the way around. If something sounds really weird or alarming, take a close look to see what’s going on.
Apply the brakes firmly, with hands off the steering wheel, a couple times during the test drive. Good braking with no pull to one side? You win!


