So here’s the video
When they take the dress out of the 3D fabricator it’s got all these intricate, interlocking moving hinges that connect the pieces together.
I get that 3D printing can assemble rigid structures by using a laser to zap plastic but how can 3D printing make a hinge where it’s required that one object surrounds another and there is clearance between them to allow movement. How do you “print” a pin inside a sleeve and have space between them.
What you are really asking about is gaps. Obviously, you can print a shape with a void in it - such as a hollow cylinder with a 3d printer. But how do you print the pin that goes inside that hollow cylinder and keep it from touching the cylinder it is inside when it is being printed?
TLDR, there’s this powder. You shine a laser on the powder to make a 2d fused surface. You then send across a device that looks like a standard inkjet printer head and it sprinkles a layer of powder down. You then use the laser again. You keep doing this over and over.
The hollow hinge is separated from the pin inside that hinge by a layer of unfused powder. Somehow they get rid of that powder after the dress is printed (in the video they seem to be spraying it with water or solvent at high pressure) and you end up with a wearable dress. They probably had to spray the solvent into each hinge to blast free the obstructing powder to “free” the hinge and let it work.
What they don’t tell you about the new “miracle” of 3D printing is that almost nothing comes out of the machine ready to use. If you have any shape that is more than a simple lump or convex shell on the platen of the machine you also have to print a “support structure” for any overhanging features. In the SLS process the plastic powder is its own structure. In SLA or FDM (“fused deposition modeling” - what most people know as 3D printing) there are “stalactites” of supporting plastic that have to be removed before you have a usable part.
Since the solid models are just CAD entities in space they can be interlocked so long as the clearance between them is sufficient to let the parts be separate and moveable after printing. I have an SLS adjustable Crescent type wrench that was given away as a sample. It has three parts and works just like my Craftsman wrench, albeit a little rough.
Another way is to use a second material to print the support structures, one that can be removed by dissolving it. For example, PVA can be used for the support structure, it dissolves in water so you just need to submerge the print to remove it.
Having said that, with carefully designed models it is possible to print in-place hinges using FDM.
I did not watch the vid. Over my bandwidth and download allowance. But from the site - “Thousands of interlocking pieces made the dress” I’m sure, each one printed and later put together. No magic there.
The video clearly shows the dress coming out of the printer in one piece. No “assembly” required, per se, but plenty of cleaning (as described by Habeed.)
If your brain can distinguish between a hinge and an enclosed pin, even when they’re touching . . . all you have to do is teach the computer to do what your brain does. I’ve worked with similar problems in the area of type, e.g. how close can two characters in a given font touch, and still be perceived as two characters, but without anything resembling a space between them? It’s not a different principle, just an additional dimension.
another fun fact they tend to leave out is the slow speed of 3D printers. If people think they are like printing with a laser printer on paper they are going to be very disappointed.
When 3D printing really started taking off, the thing I always saw all over the place was a workable, done in one shot, crescent wrench. To me, that was the ‘this is huge’ moment. That took us beyond being something fun to play with or even being able to mock up a prototype bottle or something for a company to actually showing that this machine probably has a lot of potential that we haven’t figured out yet.
In the second pic down here you can see the pin is actually formed as part of the adjacent piece.
I think they are using compressed air in the cabinet to blow away most of the unfused powder, essentially a sand blasting cabinet minus the sand. At 3:05 you can see them working the material over an air table to work the rest out of the hinges.
What they’ve done in printing an entire dress in one piece is impressive - but mostly in the cost of the SLS machine of that size and the volume of wasted powder for part support. You can tell they’re treating it very carefully until they get all the joints cleaned out and moving freely. Agreed - promoters NEVER talk about print time and cleanup!
I work for a company that does 3D printing services and sells 3D printers and am conversant in 3D printing.
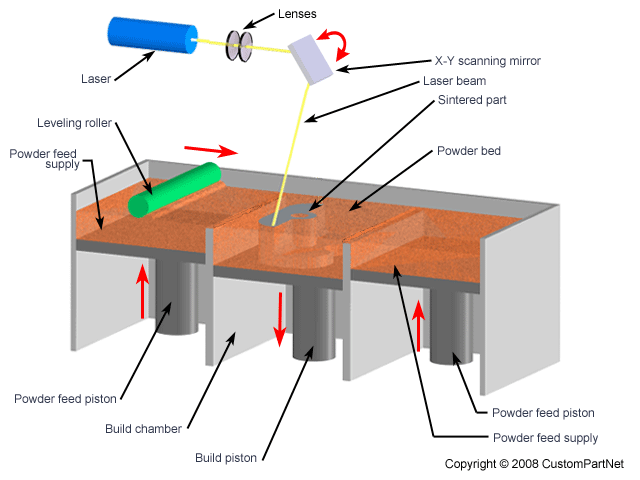
Nefario, who apparently also works in 3D printing, gets it right. The reason this dress and assemblies in general can be built with Selective Laser Sintering is that the build is self-supporting. I’ll tell you what that means. See this graphic. The part is built as follows:
[ul]
[li]A layer of nylon powder is spread evenly across the build area. Powder is supplied by the bins on the left and right and the part is built in the center.[/li][li]A laser hits the powder where the part layer is to be built and fuses (sinters) the nylon grains together. The remaining powder maintains its granularity[/li][li]When a layer is complete, the piston supporting the part in the center bin drops a little bit, pistons on the right and left push a little more powder out, and the process continues until the part is complete.[/li][li]The center bin is removed from the machine and the parts are retrieved from the pile of powder. The excess powder is removed from the part by blowing it with compressed air.[/li][/ul]
The remaining powder, since it’s solid, acts as a support for and separator between separate parts in an assembly, making it “self-supporting” and allowing for the direct printing of an assembly without a separate assembly step.
You can print assemblies using Fused Deposition Modeling or Polyjet printing, but this requires the use of a support material as the separator/support between parts. This support material is typically soluble and dissolved away by tossing it into a solvent/water solution bath and letting it churn for a bit, though common practice is to cut or chip away as much support material as you can before tossing it into the solution.
You can reuse it a limited number of times, but the material is degraded due to the fact that the build area in the SLS is heated up to just shy of the nylon powder melting point as part of the build process. You obviously wouldn’t want to mix it with any fresh material either.
You don’t use solvent to clean out SLS powder; you just blow it away with compressed air. You only use solvents for FDM or Polyjet support structures.