Shape cardboard. That part is what had square coasters win the Christmas sweepstakes. I painted the shaped cardboard but that may not be necessary since the next step is to cover it with lightweight spackling.
First layer is very thinned out. I used water and the paint color I wanted to thin. Second layer much thicker and textured for that, you know, textured look. Sand that down, get more colored lightweight spackle to a thickish consistency and stencil on design. Take outside and spray with protective coating because we all know spackle is porous and rather brittle. Because I have an stupid amount of spray lacquer, that’s what I used. It took a few coats and a spray clear coat would probably have been faster and easier.
Oh and the bottoms were painted but only got a very thin coat of spackle and sanded vigorously. The candle holder has a felt bottom and the coasters cork. The peel and stick kind.
So, my school has one of our big fundraising events coming up, and the faculty decided to collaborate on making a basket for the basket raffle, with the theme of Beach Fun. Well, to me, nothing says beach fun like sandcastles, so I 3D printed up some sandcastle buckets: One tower with parapets on top, one tower with a spiral staircase winding around it, and one straight wall section with parapets on top and a staircase going up the back side. The towers both have the school seal molded at the top, the wall has the school’s name on front, and the stairs all have pawprints going up them.
(The rampart-tower didn’t finish printing until this morning, due to some minor technical issues, and I forgot to get a picture of it before giving it to the teacher organizing the basket. It’s purple, with the seal in yellow.)
Cool. I’m a little skeptical about the text–seems like being on the side like that, it’ll just slide over itself as you lift the mold. But a neat idea nevertheless.
Hmm, I’ve got a snow day with the nephews coming up. Some snow molds along these lines could be fun.
The text is tapered in such a way that, theoretically, it should lift off cleanly. Hard to say if it’ll actually work, of course, sand being a notoriously fragile medium. But hey, it’s there.
A few years back we lost a saguaro on our property. The cactus specialist who installed the replacement striped the flash down to the ribs and we set it aside to dry out and skeletonize. After a couple of years we had a shriveled mass of cactus ribs being held together by what had been the cactus innards. Not too attractive. I decided to step in an effort to bypass natural decay. I (very patiently) removed all of the dried innards, leaving the ribs attached together at top of the cactus. I then used rings made of rebar spaced at intervals to provide some structure to attach the ribs to. Sealed with some boiled linseed oil, sank a galvanized pipe into concrete as a stand, then set the cactus up.
I’ve finally found something to plant that I can’t kill.
ETA: The skeleton is supported by the cactus ribs, the rebar rings and wooden (teak) base just spread the ribs out and hold them in position. They do not provide any vertical support.
I have a tine well light installed in the base to illuminate the cactus from inside. Need to play with it a bit, not really happy with the way the light looks.
We lost a fence post cap in the last gale and that was the catalyst for me to install 4 solar lights instead. They arrived today and installed pretty easily. They look good and now I have 3 spare post tops instead of missing one.
I’ll be able to verify tonight if they’re all working correctly.
I fixed my leaky hose bib thankfully with just a small cleanup of the thread and a new extra think red washer.
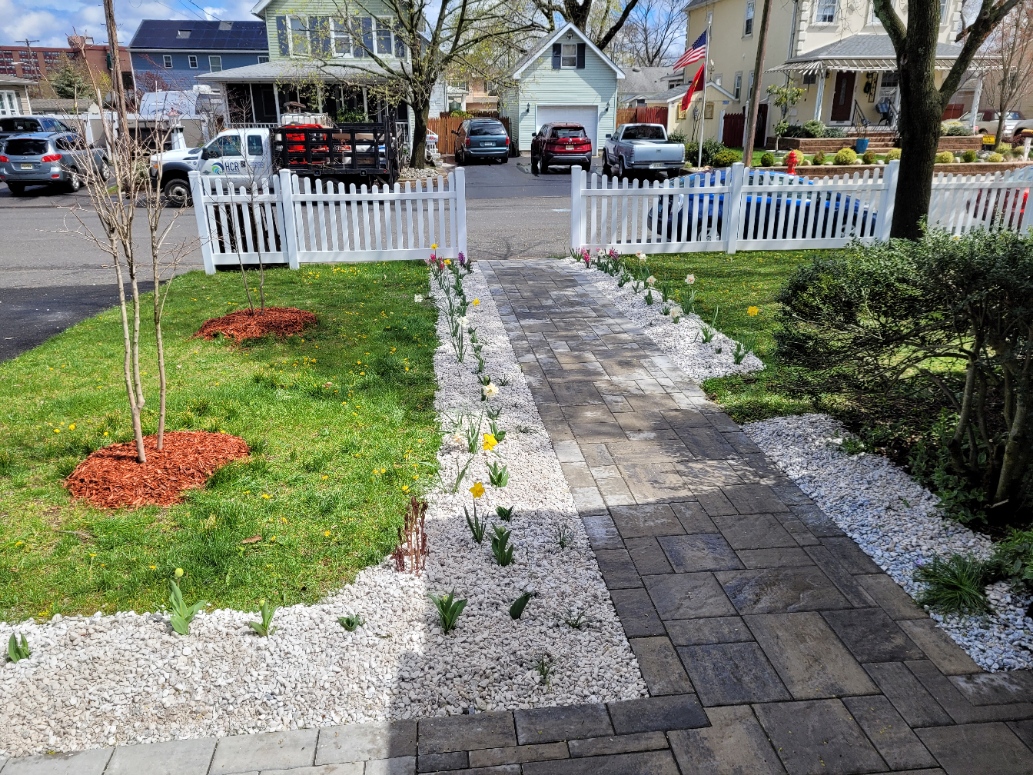
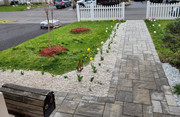
Flower Garden project is progressing. Last week we went from this:
To that:
We laid down a ton of rocks - - - - Progress of job - - - - - - - Final view from driveway -:- -:- Thumbnails will expand on click.
A simple design with good, solid craftsmanship. Something like that can last centuries.
@What_Exit , how do you get flowers to grow in the gravel? There’s obviously some sort of more fertile soil underneath; does the gravel on top hinder the flowers? And how well will that work from year to year?
In this case we planted the bulbs first and put the gravel around the flowers already growing. The first picture shows the before. We put down about 2" of rock.
It started as an erosion protection that you can just see in the lower right corner of the first picture. We decided we liked the contrast and I ordered enough rock for the flower beds instead of putting down the weed paper and wood chips. I’m fairly unhappy with that combo.
From what we’ve read, bulbs and things like dandelions will grow through the rock, but almost everything else will not. To add more bulbs, move the rocks aside, dig the hole, plant bulb, put dirt back and put the rocks back over this thinly. We’ll see how this goes as the year goes on.
We love the look so far. But it was a lot of work. Thankfully I have two twenty-somethings living at home to help with the project. (Help as in do most of the work.)
SWMBO wanted to replace the bathroom door with a barn door. So that’s done. There was a hole in the wall from when we had plumbing work done. I used the diagonal pieces SWMBO didn’t use on the door, to make a ‘hatch’ (that still needs to be painted, as I’ve just finished it).
I’ve had my Workmate 225 work bench for 20 years. Today I noticed the step has slots for four screwdrivers and two wrenches. Oy, vey.
Going up on the roof to tar around the chimney and remove the DirecTV satellite dish. This way I can also tar those bolt holes.
I get just a little water down the sealed off chimney during a heavy rain with high winds, so I’m assuming there is a small gap between the flashing and bricks. Hopefully this eliminates the issue. Might take months before I find out if it worked, so not a big issue to start with.
I already removed the DirecTV coax cable from the basement. When I moved in there were 3 older cable runs, loads of telephone wire and some other miscellaneous wires. I think one was for a long gone intercom. At this point my overhead in the basement is down to actual power lines, some cat-7 lines I ran very neatly, a signal wire for the doorbell, a tired looking antenna wire for radio and my Fios cable. What a nice difference, it makes tracing wires pretty easy too.
I may pull out the antenna wire at some point as I moved the stereo a few months back and went to a different rig. But this one is impossible to confuse for anything else being that old light weight 2 wire antenna wire that was used for so long.
ETA: Jobs done and appear successful. Removing the dish was more work than anticipated, with 10 long bolts holding it down, but still nothing too hard.
I ordered the part to fix my garage door. It goes up unevenly as one pulley is broken. More importantly it doesn’t always close as it goes down unevenly.
It should either be a simple 10 minute job or an annoying 1 hour job. I won’t be doing it today as it is going up to 87°.
Last night as I was heading to bed, I heard a weird loudish mechanical noise. I couldn’t figure out what it was and checked outside and every appliance. Nervous as all my kitchen appliances are pretty much new.
I couldn’t find the noise and it was strongest in the kitchen. I finally remembered the attic fan. I opened the door to the attic, which is insulated in a way to be virtually noise proof. There was the noise, extra loud. So I turned off the fan and set a reminder for the morning to check it out.
I got up there about 9am and adjusted the Temp setting to turn it on. Everything looked basically OK and it had a date tag of June 2018 so it shouldn’t be failing. I pushed up on the fan motor to check for vibration and the fan got a lot quieter and it had a little give. So I grabbed some ratchets and tighten all 3 mounting screwed for the collar around the fan.
I started it back up and was rewarded with a quieter fan.
I just checked, the fan is running and I can’t hear it in the kitchen or anywhere else until I open the door to the attic. Nice when problems turn out to be fairly minor.
So when I went to do the fix, there was more wrong then the pulley being borked. I ordered more parts and they arrived about 4:30 and by 5:00pm we were done. Though I had to reroute the cable as it was put in wrong to start with and probably led to the failure of the pulley and bolt. So almost $30 later but still under an hour for the job.
Found this at an antique shop for $5. It was solid wood. In a thrift store they do not sell anything made of solid wood for less than $20. I think, though, that this is a handcrafted little thing and the antique’s guy was not impressed with it at all. It is going on the other side of the sofa where Atomic Boy lives (wow, according to this thread, Atomic Boy was exactly one year ago!) and so I tried to matched it in color.
Too late to edit and show that I did not cheat the top. Since I didn’t have to worry about sanding through the veneer, the water stain (eventually) disappeared. I’m gonna wait one more day for the lacquer to properly cure and them I’m gonna flip it upside down and give the unfinished self bottoms some love with wax.