There are sharespace workshops here where I could try to use their 3D printers and laser cutters, but I have never done that stuff myself so far.
Don’t worry, people at those places love to help out. And they’d need to at least be looking over your shoulder for the laser cutter, anyway, because those need to be supervised (there’s a chance that they can start a fire).
Though I suppose that the right material might not be available. I was using material 2.8 mm thick, which is apparently fairly typical for laser cutters around here, but I don’t know if that’s an international standard. The design could be adapted for other thicknesses, but the 3D printed cursor would need to be tweaked a bit.
Centering your blade is crucial. The problem is that there are YouTube videos that do not all say the same thing. I have done a lot of resawing where accuracy is needed, and I find that the best way to center the blade is to adjust it so that the deepest part of the gullet, between the teeth, rides on the center of the wheel.
I finished a weird project in my darkroom yesterday…
…I did an experiment with conversion of digital photos to film, in the most preposterous way possible: I photographed my computer monitor.
Many will ask why anyone would ever want film negatives of digital photos–I like to work in the darkroom, this gives me the ability to use standard darkroom techniques, dodging and burning, and I might use this to do selenium toned prints or sepia tone prints.
Besides, film photographers all still have loads of digital photos that they might want to print, and we all have our cell phone in our pocket at times when no other camera is available.
The experiment was a rousing success–I did 4 darkroom prints from negatives I shot of my computer monitor, and once I dry-mounted and matted them, they look stunning.
I showed the whole story in this YouTube video:
Digital to Film… The Stupid Way (and It Worked!)
Very cool. Those look great!
I will try that next time, thanks!
I did figure out what my fence issue was, the resaw fence locking bolt was too long, so instead of pulling the resaw fence tight to the main fence, it pushed the fence out slightly so the resaw fence only made contact on the far end of the main fence and the locking bolt… face palm for not noticing that when I was setting up the saw, but a minute with hacksaw and file, and the locking bolt works correctly.
So today we finally put the finishing touches on our new garden shed. The shed itself is prefab, so not too much DIY except for a few coats of paint, but the real work was the foundation—on which we probably went a bit overboard, but since the shed left by the previous owner all but collapsed thanks to its shoddy foundation, we thought we’d rather do too much than too little. But since I have basically no experience pouring concrete, it was a bit of a journey for me!
Choosing the plot:

I’d built a little template to aid in the positioning of the concrete posts:

Our ground is basically stones and more stones, so digging the holes was more work than anticipated:

Pouring the second and third rows:


Foundation finished:

Putting up the shed:

Paint & roofing felt:

Shingles and we’re done!


The ladybug is a nice touch.
Ever since my wife and I bought this house we’ve wanted to put up a Little Free Library in our front yard. We live less than one block from an elementary school and get a lot of kids walking by the house, so we thought it would a be a nice contribution to the neighborhood.
Yesterday morning I saw a Facebook post by our local newspaper. They were having a big parking lot sale and were selling, among other things, some plastic newspaper boxes – the kind free advertising circulars are placed in. No locks, very flimsy. But hey, for $10 they were worth going to look at. So my wife and I piled into our son’s pickup and drove across town to the sale.
The newspaper boxes were absolute garbage. At best they were warped and bent, at worst they were cracked at broken. Useless for what we wanted, which was of course something to use for our eventual LFL.
I asked the person running the sale if they had proper metal newspaper dispensing boxes for sale. You know the kind: coin-operated locking mechanism on the top, front door with a bottom hinge, glass window on the front. The ubiquitous newspaper box. I have searched online in the past for these, buying new seems to impossible and used ones go up on Ebay for ~$500. So I thought I’d ask. She told me no, those were expensive and had special locks that only they had the keys to and they never sold those to the public – it was a legal issue. I had my doubts about that (but they are almost impossible to find for sale, sooo maybe?) but ok, whatever. I wasn’t going to argue. I found a 10 gallon Campbell Hausfeld captive air tank for $15, something I’ve wanted for a while, so I figured the trip wasn’t a total waste.
But. BUT!!! As we were loading the tank into the pickup this skinny dudebro wearing a hoodie and a wool beanie (it was like 85° in the shade at that point) saunters up to us and says “so, uh, my boss told me to come tell you you can have two newspaper boxes, as long as you, uh, you know, take the ones that don’t lock anymore.” $50 for the pair.
Uh. YES!!!

LFL, here we come. One I’ll take to the school I teach at and put it outside the main entrance to the classroom building. The other I’ll use as my home LFL.
The box on the left was in active use until last week – it had a stack of newspapers from last Friday still in it. The locking mechanism is still in place and the padlock for the coin tray is still on it; the newspaper people couldn’t find a key and told me to just take it as-is. The latch broke and apparently it wasn’t worth fixing. I would like to keep the lock/coin box on the top but I need to figure out how to open it and remove all the innards without damaging the box.
The box on the right was last used in 2015 and the locking mechanism is long gone. The box on the top is empty of all its innards.
My plan is to strip off the old paint and labels, fix any holes, put new plexiglass on the front, add permanent shelves inside, and then paint it. Or, for the one I’m taking to work, have the kids paint it. The one I’ll keep at home I’ll register with LFL, the one at work I’ll get some generic “little library” plaques and rivet them to the front. I don’t want that one to be publicly known.
I’m hoping this will be a fun and productive winter project.
Those are wonderful! I really want to see how they turn out.
That’s a really cool idea! Keep us updated on the progress.
Not a great DIY fix here. My deck had a rotten plank on the top step going down. It didn’t look to bad, so I decided to clean it out and use a rot petrifier to resolve it.
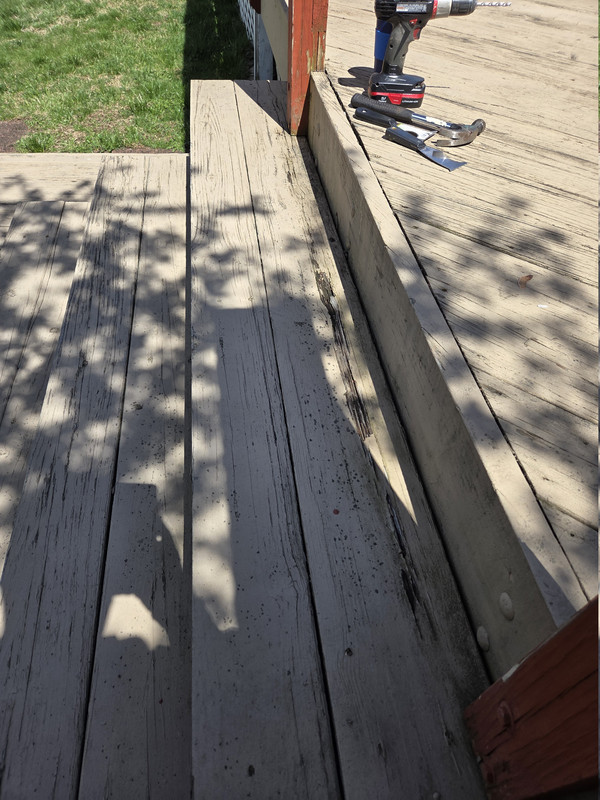
Sadly as I started cleaning it out, I discovered it was deeper and a lot longer than I expected.

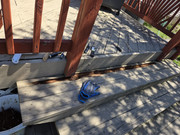
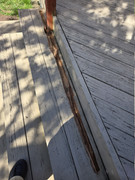
Sanding such an awkward spot was hard. I basically built a couple of custom sanding blocks to do the job and drilled weep holes for drainage.
Then came the rot killer and then painting it with 2 coats.

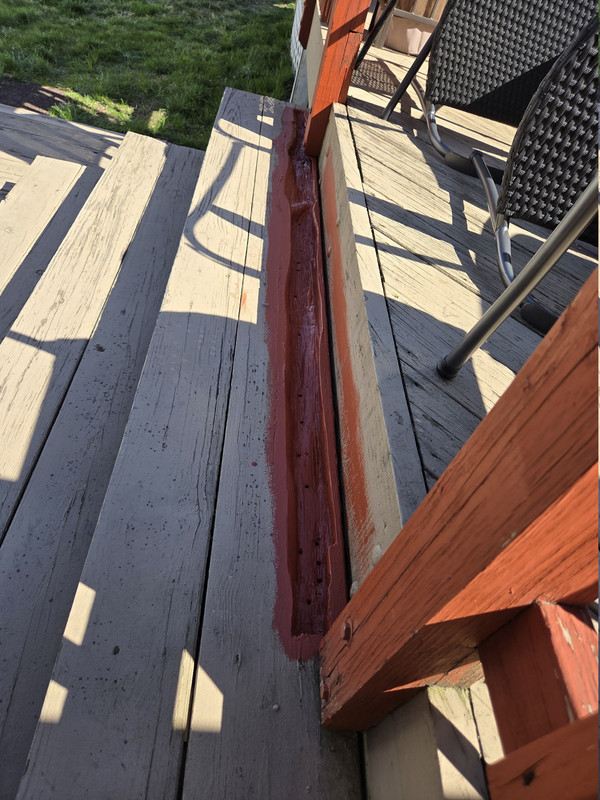
All of this should buy me a few years before we redo the entire deck. I plan to expand it out 4 feet and lose the lower deck.
Not my proudest job, if I knew what I was getting into I would have just pulled the rotten board and replaced it. Problem is the rot ran mostly out of sight and so fooled me.
Excellent! Right now all my outside steps are cement so I don’t have to worry about this. But I will be moving soon and I may have outside wood (that’s what she said!) and would like to hear more about this “rot metrifier” of which you speak.
I’ve used a different marine grade rot killer in the past on wooden boats and because I had it already, for some projects at the old house.
Basically clean out as much rot as possible with a variety of tools, I used my 5in1 tool the most but also chisels and the like. Then I wire brushed it to get into the grooves and finally sanded.
Brush and blow all the dust and debris out and then generously poured and spread the wood hardener or rot killer. I used a cheap disposable chip brush to spread the liquid. 24+ hours later I painted the first coat.
The deck came with the house, so I used the only remaining deck paint. Next year I may repaint the deck or decide how soon it will replaced at least.
Do you have a socket set with 1730 sockets rattling around in the (metal) box (not one of which is a 10mm) because the formed plastic tray disintegrated eons ago? Try burpo’s Socket Containment System — I line them all up against the inside of the box then grab the glue gun and make a MONSTER BEAD all the way round the inside. A tiny bit of persuasion and the sockets pop right out and can slip back in when finished (you may need to scrape a wee little glue off the socket(s) where it stuck to the indicator engraving.) Fit a piece of foam rubber in the lid and cut it to size so’s the sockets stay in place. It may not be pretty, but it’ll be less noisy.
Here’s what happens to 10mm sockets (my mechanic confirms this),

Can you show us this? I was trying to follow your description but with no visuals, I got lost.
(Now I know what a 10mm feels like…)
NM Can’t get pix to work from imgbb.
Okay, I can live with the disappointment… ![]()
No, I’ll try again tomorrow; I might have to, God help me, read some instructions. Hang in there.
Oh, @digs, are you there?
I am now… and really impressed!
That’s really clever. Did you have to pull the sockets out before the glue completely dried? Or are they slippery enough to be pulled out even when it’s totally dry?
I’m trying to imagine a quiet socket set…