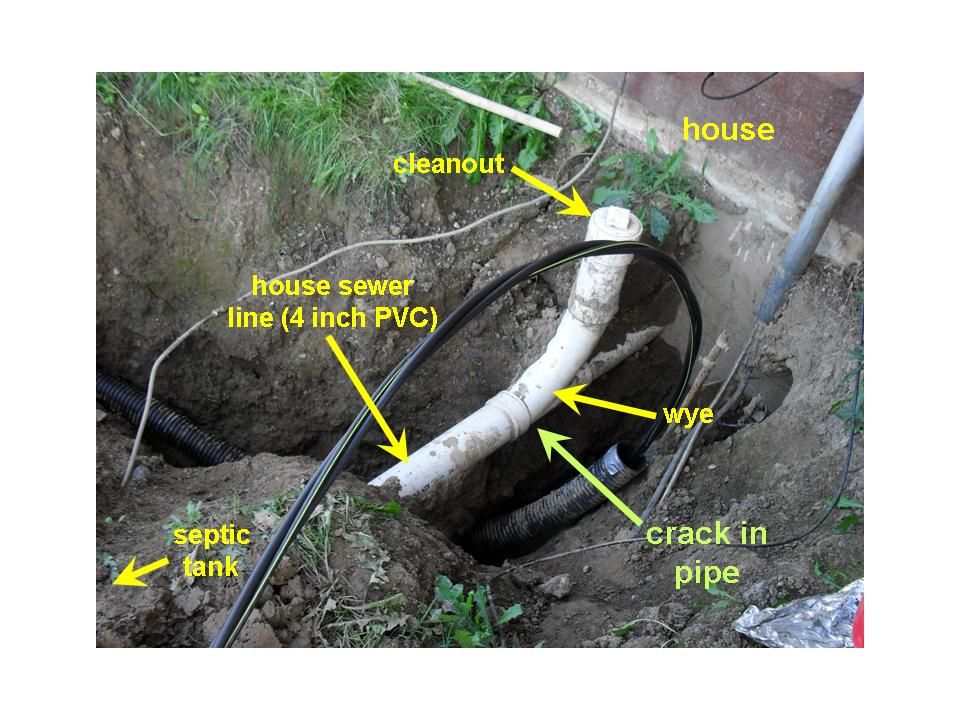
I’m in the process of installing underground electric service to my barn. The digging process required me to dig under & around a section of the sewer line between my house and the septic tank. The house was built in 1989, so they used 4 inch PVC pipe for the septic line. We live in central Ohio if that matters.
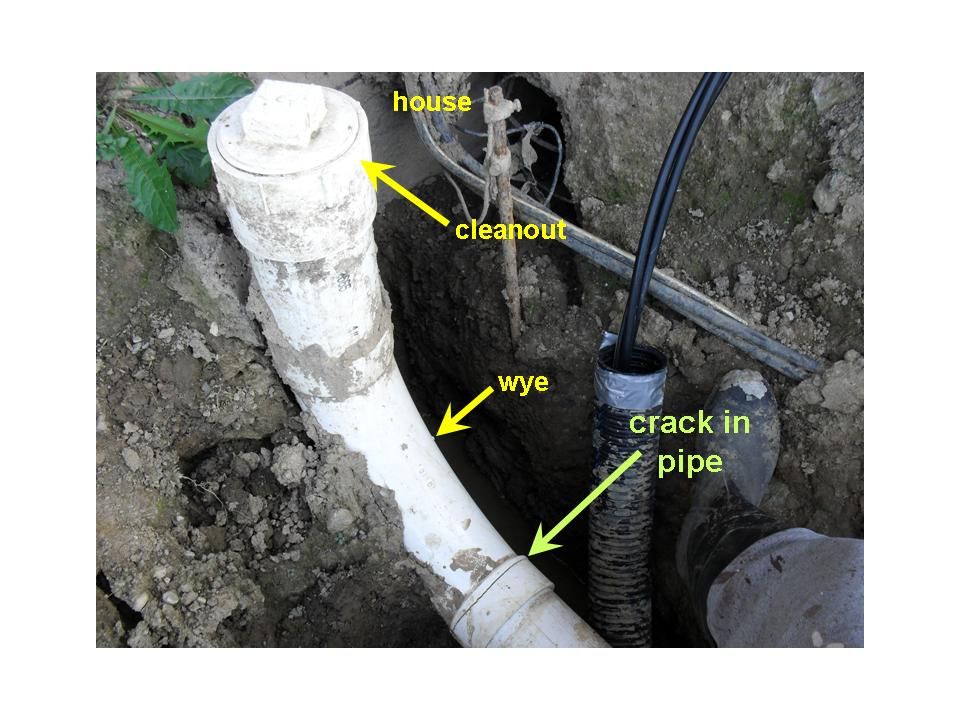
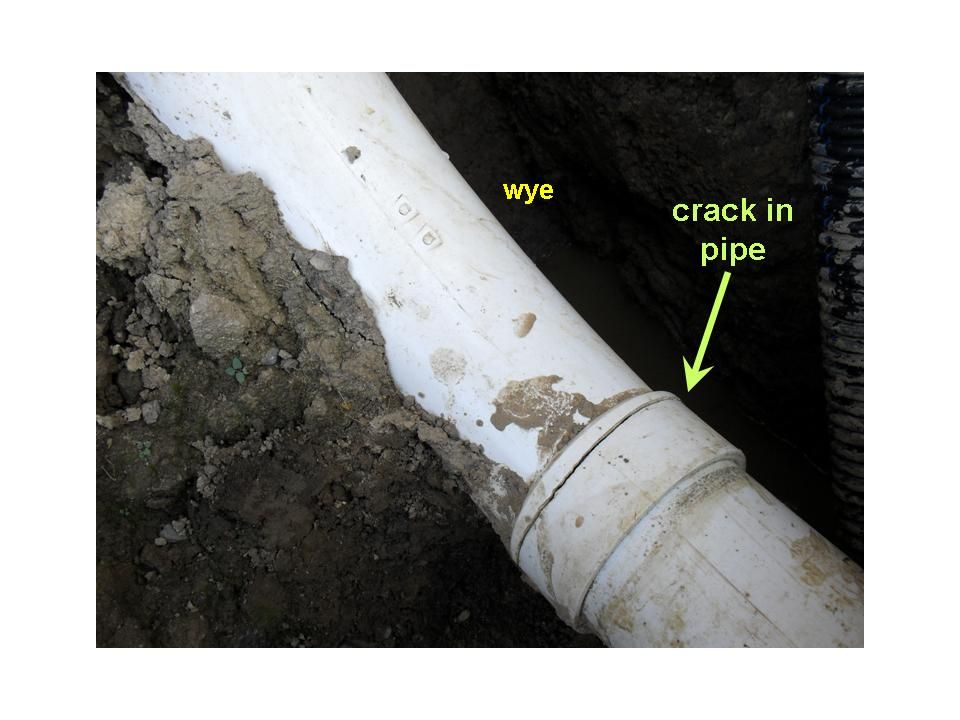
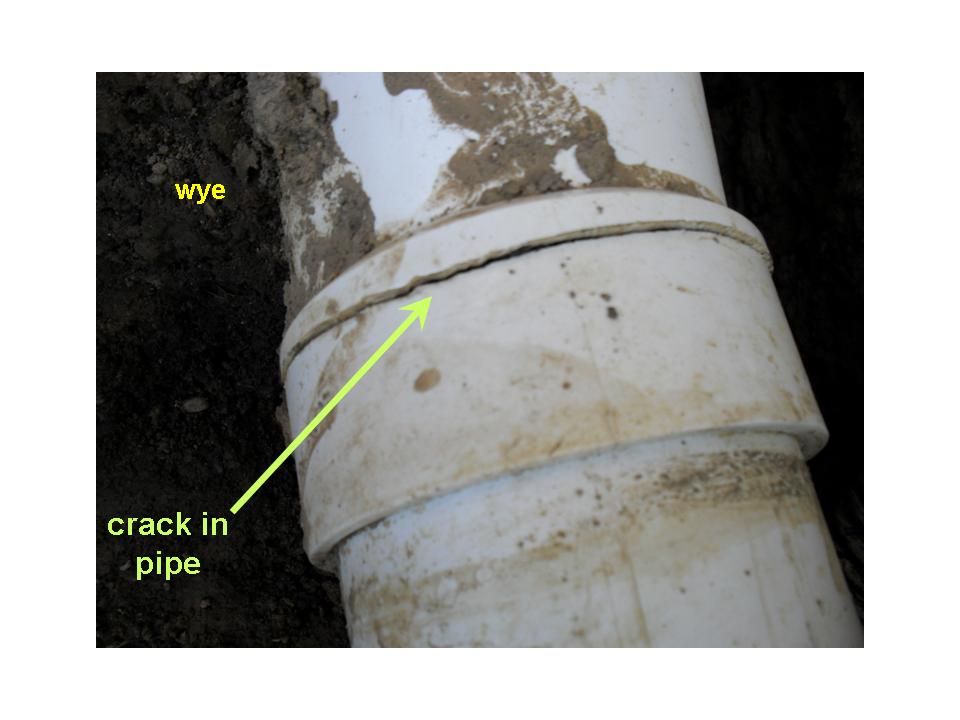
When I exposed the cleanout wye in the septic line I discovered the pipe was cracked! There is a circumferential crack on the wye, where the smaller pipe fits in to it. The crack goes all the way around. It’s also obvious waste water is leaking from it. Here are some pics:
Cut back the house line and cut back the tank line. Leave enough room for a union on each pipe. Create a preassembled section with the cleanout. Glue everything together.
If it seems to difficult to glue stuff in place, use Ferno couplings instead.
Yup, cut out the Y and replace it. It’s going to take two couplers (and some extra PVC) since the resulting gap will be wider then the new Y. Also, on the house side, make your cut as close the the Y as you can. You have very little space to work there and if you make a mistake and have to cut it off, you’ll have even less space.
Also, you’ll probably want to unearth more of the pipe on the tank side. Getting a replacement piece in usually requires bending the PVC a bit so if another foot or two is available it’ll be easier to pull it up and get it into place.
Dumb question, but how do I actually fit it all together? What I mean is, the small ends of the pipe fit in to the big ends of the pipe, so… how is is possible to cut out a piece and put in a new one?
Cut right next to the Y on the house side and then probably about 6 inches away from the Y on the tank side (you’ll need some room to work).
Clean and glue a coupler to each end. You know have a “big end” on each end of the pipe, right.
Now, take your new Y. Take the extra piece of PVC I told you to buy cut two piece off of it, clean and glue them into the Y (the straight parts of it, not the top part, look at your picture). The Y now has ‘small ends’ coming off of it.
So far, so good?
Now, you put the Y with the parts sticking out of it in the hole next to the pipes you prepared. Mark them with a sharpie so you know where to cut. They go all the way to the back of the ‘big end’. You’ll see what I mean when you have all the stuff in your hand. Cut them to size, clean and glue it in place. This is the part that’s going to require bending the PVC that’s already there around to get your new piece into place. It’s a PITA. If you make the pipes a quarter of an inch shorter, I won’t tell anyone.
A few things.
First off. I should have mentioned, now that I think about it. This should all be dry fit first. :smack:. But I don’t want to go back and retype it. Dry fit it, then take it all apart and clean and glue it.
Once it’s glued, it doesn’t come apart. You have about (literally) 2-3 seconds to move things around once PVC touches PVC, but that’s it. You’ll feel it firming up as you assemble it. If it’s not right, you cut it apart, go back to Home Depot and buy new parts. All your parts are circular except for one. The only thing you have to make sure of is that the Y is pointed straight up, so don’t get to anal about marking each piece as you take it apart. Drains with traps under sinks are a bit more complicated.
Make sure you clean each piece. When you buy the PVC glue, you’ll see a purple bottle of PVC cleaner (or primer maybe), you need that. When you’re ready, coat both mating surface with the purple stuff. It’ll make a big mess and get all over the place, don’t worry about it. Then both surfaces with the glue, put them together and they’re bonded forever. No second chances.
ETA I’d put the upright in afterwards, it’s just going to be in the way otherwise. Same procedure though. Make sure your Y ‘swoops’ towards the tank.
4" schedule 40 unions are serious bucks, so skip that idea.
Cut the wye out. I’d cut close to the wye on the house side, and on the far side of the wye, I’d take about a half foot of pipe. Dry-fit a new wye and a short stub of pipe to fit and slide a fernco coupler onto the pipe leading to the tank - the wye will glue to the house side and the new stub of pipe glues to the far end of the wye. Slide the fernco into position and tighten the clamps. Then, you can rebuild the vertical section for the cleanout.
Eta: great minds think alike, or is it just minds that have stared at similar problems in similar holes?
That’s a good idea, a 4 inch pipe probably isn’t going to bend the way I was suggestions.
With a coupler that doesn’t have a stop, you slide it all the way on to one pipe (on both sides), lay your pipe in place, glue both halves and slide it over. No bending required.
It’s helpful to measure how long the coupler is, divide by two and make a mark on one of the pipes that far up it so you can make sure you have it about even. Then make sure you don’t get the PVC cleaner all over your mark, it’ll take sharpie right off.
I think that you are assuming they suggesting re-using the existing Y assembly. They aren’t. You are going to have to buy another one.
What they are suggesting is that you cut the pipe between the house and the Y. As close to the Yas possible. Then cut the pipe going from the Y to the sewer, about halfway between the crack and the arrow indicating “4 inch PVC”.
Then lift out the whole Y assemble. Take it down to your local plumbing supplier, and tell them that you cracked the join and you need a replacement Y assembly. That will include a couple of collars (what Joey calls a coupler) for 4" wastepipe and a short length (about 12") of 4" wastepipe.
So:
Attach (but do not yet glue) a collar Y to the pipe leading to the house.
Attach the new Y to the collar.
Slip your short length of wastepipe into the male (“big end”) of your Y where your current one is cracked.
Align it beside the sewer line where you cut it. Mark it about 1.5" before it contacts the the start of the sewer pipe.
Take the short length out of the Y. Cut the short length along your mark. That is now your join length.
Take your join length, place one end into the male of the Y. Place a collar on the other end. Place the other end of the collar over the 4" sewer pipe.
If everything is in the right position, you can now glue it in place. But only glue anything when you are sure that everything is right. You need the free play of the joins to give you flex and to allow you to position the collar correctly.
Thanks for all the replies. Especially the detailed ones from **Blake **and Joey P. I did not realize you could buy couplers without a center stop.
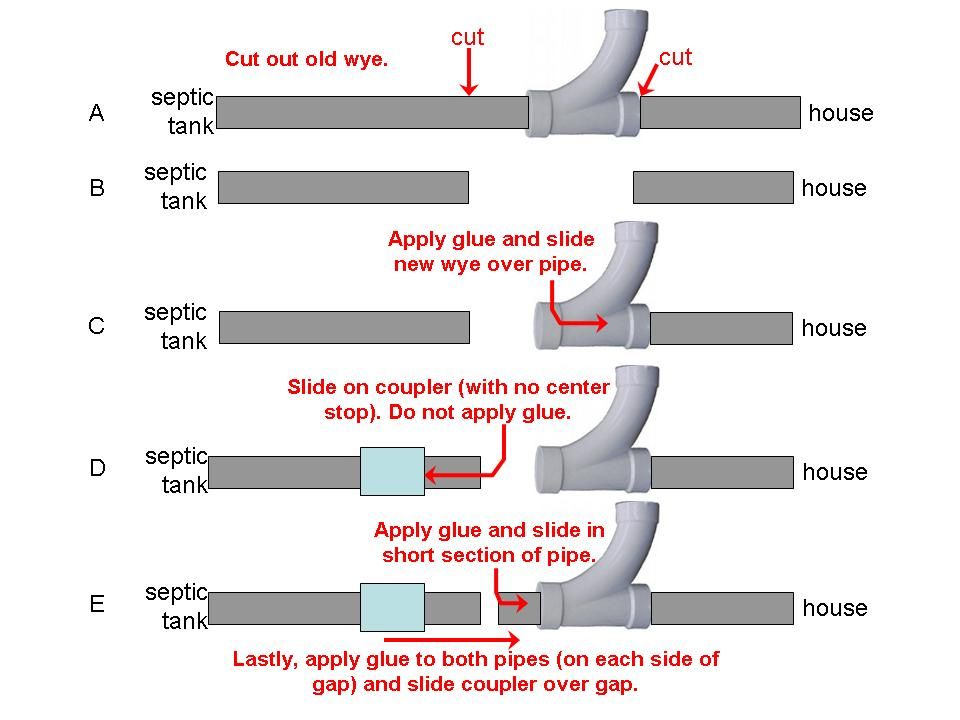
So based on your procedures, and a bit more contemplating, I came up with a drawing that outlines a plan. It is slightly modified from the procedures described by **Blake **and Joey P, but I think it might work. Here it is:
Yup, that looks right. You caught my mistake/oversight. You don’t need a coupler on the house side (or the tank side, it’s a one or the other thing with your setup).
Also, if you don’t live alone, make sure no one decides to use that time to, say, flush a toilet or take a shower, and if people have a bad habit of not listening to you, just go ahead and shut off the water (and flush all the toilets to drain the tanks), just so there aren’t any surprises.
If you have access to a SawZall (reciprocating saw) it’ll make cutting the PVC a lot easier.
That will work perfectly well, but it seems over complex.
I can’t see any reason you need to have two join lengths joined by collars. You can just slide your join length into the male of the Y at that end, then measure to the sewer pipe, and cut it to length. The only collar you should need is between the sewer pipe and you join length.
What you’ve suggested will work perfectly well, I just don’t see the point in using an extra collar and cutting the jion length twice.
I also didn’t realise that your Y had a male fitting on the house side as well. I was assuming it was standard 4", and figured you would need a collar for that side as well.
I unfortunately have a LOT of experience with this stuff. When I had a septic system it had 6 cleanouts (3 on each side) and they all stuck up just enough that the lawnmower would whack them, but didn’t stick up high enough to be seen when the grass got too tall. My kids were constantly breaking them. Most of the time they would just knock the top off, but occasionally the cleanout would crack down at the bottom where yours did. I always kept a bag full of PVC parts in the garage.
Your repair plan looks good to me too.
What’s the area like when the dirt is filled back in? If people can walk on the cleanout or kick it then it will probably keep breaking. I ended up putting flower beds over half of mine to keep the damage down to a minimum (and every time they broke it at the bottom like that, when I put the new cleanout on I made it lower to stop them from hitting it again). You may want to do something similar to stop it from getting damaged again.
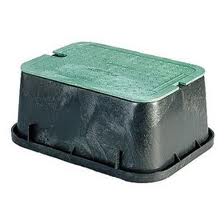
Something like this is probably exactly what you’re looking for.
It’s meant for burying sprinkler valves/controls. If you can’t find it at a hardware store, then a place that sells sprinkler stuff will have it. An electrical supply house would probably have something similar as well. You could probably even make something workable out of a few pieces of pressure treated 2X10 lumber.
Or, if you’re not worried about aesthetics, an big orange road cone would do a find job of keeping people from tripping over it and keeping the lawnmower away from it. Some RoundUp a few inches around it would make sure you don’t wind up with 3 foot tall grass growing up around it when you don’t mow right up against it.
I think I would turn the “Y” around, as in my experience, blockages generally occur on the house side, with unfortunate objects being dropped into and flushed down the toilets.
I assume your full plan has another step between B and C, namely:
B2: Do steps C-E without glue, to make sure everything fits, then go back to step C with glue this time.
But I thought I mention it for anyone else reading.

