My car, a 1995 Dodge Intrepid, still runs very well. I haven’t had it in a shop since I bought it off my Grandma over 2 years ago. I can do 85 down the expressway with nary a suspect noise from the engine.
The suspension is another story. It pulls to the left and I have to keep the steering wheel at quite an angle to keep going straight. So I took it in to get an alignment. The mechanic said he wouldn’t do because I have so many shot bushings that a bump could set it out of alignment. With the car up on the rack, he pointed out all of the bad bushings.
I know I can replace them. I’m almost done rebuilding the engine in my truck, so replacing some bushings shouldn’t be too difficult. The problem is that I have no idea what parts to order because I don’t know the name of bushings or the other parts of the suspension. I don’t have a Haynes manual or anything like that. As it’s about 20 years old, I’d rather not buy a manual for a car I may not have much longer.
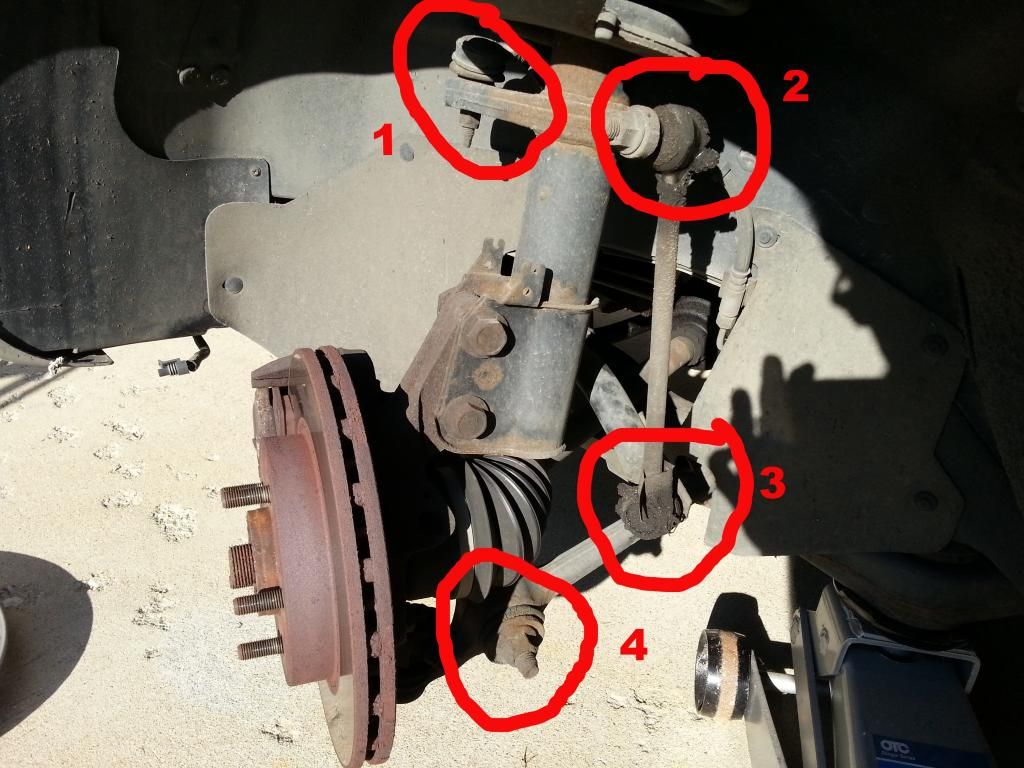
Could someone give me the names of the bushings in this picture, please? (I joined photobucket for this post. I hope I have all the settings correct and you can see it.)
Thank you so much. I priced it all at Advance Auto Parts for both sides and it comes out to $145 before tax. Looks like I could get it done in a weekend depending on how easy those bolts come out.
The parts I priced have grease fittings. Are those better than sealed joints? How would I get the grease in there? What kind of grease would I use? Do the grease fittings stay on and capped or removed once the grease is injected?
The zerk fittings stay in after you grease them with (surprise!) a grease gun. They have a spring-loaded ball inside so they’re essentially self-capping. You’d fill them with all-purpose grease.
If the parts are pre-greased, you may as well leave the greasing to the shop when you go in for an oil change and lube unless you really want to buy a grease gun.
One tip on replacing these things, especially the tie rod ends is to count the turns as you remove the old ones and install the new ones with the same number of turns so the car will be driveable to the alignment shop after you’re done. Don’t go too long before having an alignment done or your tires may wear really unevenly.
To give a little bit of unsolicited advice, working on front end stuff like this is on my personal “not worth DIY-ing” list. Stuff like ball joints and tie rods can be a real pain with normal hand tools, especially if they’re rusty which they very often are. It’s so much easier and faster with a lift and air tools that you don’t save that much labor, and plus with the alignment issues you’ll need to take it in anyways. Go ahead and do it if you want to cross it off your “done that” list (it’s not that hard really,) but I suspect you may also conclude the frustration to savings ratio doesn’t make it worth it.
Heh. As far as my wife is concerned, the frustration to savings ratio doesn’t matter. Only the savings.
Plus, I’d like to say “I did that.”
I was thinking of nixing the tie rod ends since they don’t look that bad (please, correct me if I’m wrong) and I forgot to mention that I already knew that I had to replace the inner tie rod bushing.
Add in the grease and the grease gun and I’m up to about $160 in parts that I need to buy. Hopefully it will be the only time I need to do it for this car. It has 155K miles already.
Get a pickle fork or a ball joint separator. A pneumatic one is best, but I use a manual pickle fork and a sledge when I’m replacing the ball joints anyway. If I’m reusing them I use a jaw puller.
I was just about to suggest a pickle fork or several types.
I really enjoy tackling a difficult project and getting it done right, but I have a well tooled shop and each job adds to the tool list. Just about the time I think I have everything, there is always on more thing.
So, Shadowfyre, do you have a place to work on this car and can it be down for several days? And a source of transportation to the parts store for more tools? Do you already have a wide variety of tools?
Not trying to discourage a shade-tree mechanic but suspension work is a proverbial can of worms, and once you open it, you have to complete it, because you can’t drive it anywhere until you do.
Budget for more time and money than you think it will take, keep that credit card handy. When you are all done you may have saved some money if everything goes well, but it usually doesn’t.
Search youtube, there is a video showing the how-to for damn near every project. Be aware that some of the people filming these helpful videos are idiots.
If you are buying your parts at a local brick and mortar shop, inquire about special tools for assembly/disassembly. Many parts shops will loan or rent the tools for a nominal fee. Having the right tools can save a lot of time and frustration.
I gotta agree with this. And I’ll share a real life example.
I have a Subaru Outback that just rolled 150K mikes. I was getting a whirring, roaring sound from the rear that I recognized as a wheel bearing. Thinking, like you, that I would save some money by doing it myself, I bought a new bearing/hub assembly, and then borrowed the appropriate tool from a local parts store to pull the bearing.
All well and good until I could not get the damn bearing and hub to separate from the upright. All the bolts were out, but just the fact that these two metal surfaces had been mated together for 7 years, and had been exposed to the elements for that time, meant that they were not coming apart for me. I tried all the tricks. An impact wrench, and air hammer, penetrating oils, heat, etc. Not budging.
After blowing a weekend sweating and cussing, I would up putting everything together and taking the car to the Subaru dealer. $225 later, it was done.
Holy cow. $225 to avoid all that wasted effort, a ruined weekend, and general frustration.? Heck yeah.
I worked as a counterman in a parts store years ago. I called them “round rubber thingies”. Does that help ? I’d like to know how if it does.
Napa can find these bushings for you. O’Rielly’s too.
Now I’m worried. I’m not sure what ball joint everyone seems to think I’ll be disassembling. Here is a picture of front suspension.
As near as I figure it, I will be completely replacing the control arm (#15 in that link) and the end link (#23 in that link). That should cover all the bushings in the wheel well. That all seems to be bolted together. I figure with penetrating oil, a blowtorch and a breaker bar, I should be able to get it all apart.
I have found that on some cars, just counting the number of turns does not always get you in the ball park. You can’t count on the replacement part being exactly the same length as the original. A better way to do it is with measurements. This image is of a different car’s tie rods, but it will give you the idea. In this case, the green arrows in the pic show the points to measure.
Measure the old, then try to get the new one on as close you can to the same measurement.
Right, so both ends of #23 have a ball joint, and one end of #15 has a ball joint. Ball joints are a ball with a shaft coming out of it, and the ball sits in a socket and swivels around while the shaft goes through something and has a threaded end. You take the nut off first, yes, but that shaft is tapered, and while in theory you should just be able to tap it out with a hammer at that point, in practice and 155,000 miles, that tapered shaft is going to be rustingly-fused to whatever it slid into. You either need to pry it out with some sort of puller, or you wedge a pickle fork in between the ball and the attachment point and beat the ever living fuck out of with a sledge and an ample serving a swear words.
A couple weeks ago I replaced the rear hub/bearing on my wife’s minivan. The bearing mounted directly to the back of the drum brake with 4 bolts. The bolts came out easily, but that bastard was rusted in there good. It hadn’t been touched in over 11 years (2003 Chevy Venture). It took me 5 hours to get that damn thing off, but after all was said and done, it only cost me $75 (thanks to a 15% discount for ordering online and picking up in the store) for the part.
I figure not only did I save $150, but I learned how to do it, gained a sense of accomplishment and got to work out a lot of frustration. What would I have spent that time on instead? Working on my truck. So I figure it’s a net gain.
Another thing to consider, my vehicle had old tires when I bought it, and it pulled to one side pretty badly. So if your car has old tires on it that could be a factor. I got new tires last year and it now drives straight and true.
My car drove straight until the tires were replaced. I figured that if they screwed up the alignment that badly, I won’t go back there to get it done again.