This is long, but I ended up writing a tutorial if anyone wants to make their own.
This has been around since September, but I just found out about it. I did a search for Google Captions and Google Subtitles here and didn’t find anything, so there might be those who don’t know about it but might be interested. It was easy as pie to do, once I got the hang of it, using a specific program called DivXLand Media Subtitler. All it really takes is some typing and that’s it! If you have the video on your computer, and you have the program installed, you’re good to go.
I just subtitled a bunch of music videos (live clips) I had put up on Google Video. All the Happy videos you see at the link are subtitled. The first time I did one it was for fun, but then it dawned on me that it might be useful to those who are just learning her lyrics. It also could possibly help fans who are hard of hearing and not profoundly deaf. Then I read a message from another fan who teaches ESL in Korea and he said he’d use them to help his students. Often it’s hard enough for English speakers to make out lyrics, so for those who are learning the language it must be much harder since the sounds of the words are changed just in the process of singing.
If anyone wants to give this a try for their own videos, here’s what I did. Note that I have Windows XP and haven’t a clue as to how to do it on a Mac or if it works with older versions of Windows.
First, go download DivXLand Media Subtitler and install it.
Choose the video you want subtitled. Better to start with something short because the next part is tedious.
Transcribe what you hear and save it as a text file. Watch the video again and try to see the subtitles in your mind’s eye, and put each subtitle on its own line. Listen to the rhythms of talking and where the natural breaks are. If someone says “Now is the time for all good men to come to the aid of their country” you wouldn’t put that entire line in. You’d listen for a natural place to change subtitles. Such as
Now is the time
for all good men
to come to the aid
of their country
You can use the “pipe” ( | ) to make 2 lines of text on the screen. So instead of scene-subtitle, scene-subtitle, scene-subtitle, scene-subtitle, you’d put a pipe in
Now is the time | for all good men
to come to the aid | of their country
And you’d see scene-subtitle next line subtitle, scene-subtitle next line subtitle
If that makes no sense you can see what I mean if you watch this video
Here’s the text I used, broken up into manageable lines:
I used a pipe during some of the after-song patter
“Have I started off on the | wrong foot with you people?”
so that all that would appear on the screen at the same time, with “wrong foot with you people” underneath “have I started off on the”
Have I started off on the
wrong foot with you people?
Right? The Pipe can come in very handy, but don’t overuse it unless you have a lotta lotta lotta talking. Try to think of how first-time watchers will react and how they’ll try to read it.
Save your text file with a short name that corresponds to the video. That file above was named saveoursouls.txt. It makes it easier if you save it in the same folder that your video is in.
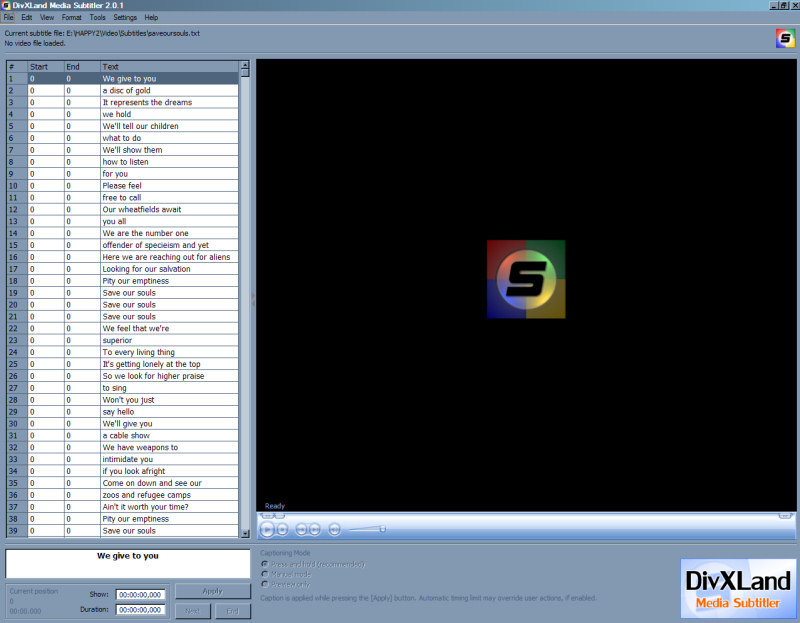
Ok, next, open up DivXLand Media Subtitler. There will be a split screen. On the left will be a blank area with the words “No text of subtitle file loaded” and on the right is a screen with their logo in the middle. Go up to File and “Open text or subtitle” then find the text file you just saved and choose it, then click OK. It will open with each line in a separate box, like this. You’ll see that the first line of text is highlighted.
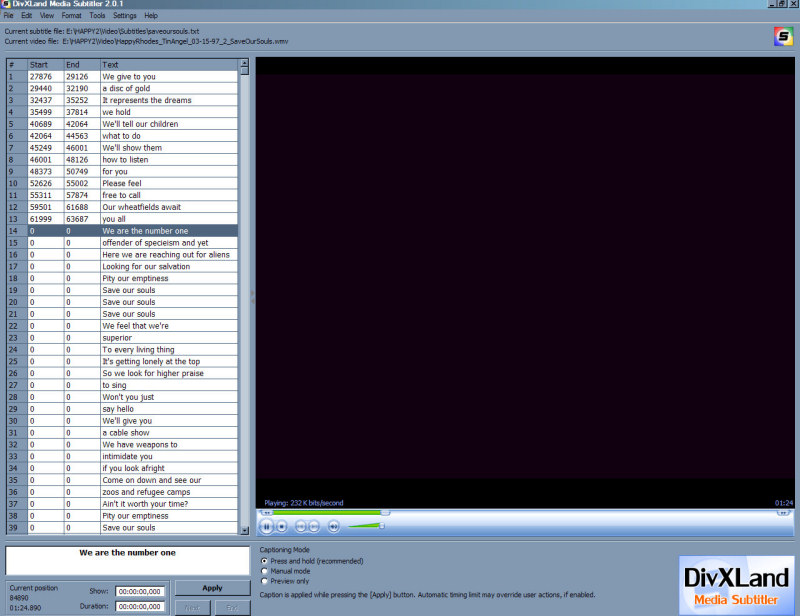
Go back up to File and choose Open video, find the video and click OK, and the video should load up on the right hand part of the screen. You can press Play to make sure it’s actually there. Stop it and set it back to the beginning.
Down at the bottom left you’ll see a button labeled “Apply.” You’ll come to know that Apply button very well.
Before I go on, you need to know something I didn’t know. You CAN’T mess the original video up. The subtitles are not embedded onto the video, like I first thought. When I was learning how to do this, every time I made a mistake I would freak, thinking that I might harm the original video, so I’d re-load the text file and the video without saving, thinking I’d just dodged a bullet. I did make a copy of the video before I started, but still, I was worried. I didn’t want to screw up the original, but there was no cause for worry.
What you’re doing does NOT affect the video. It doesn’t even affect the text file. What you’re doing is all inside the DivXLand Media Subtitler. No matter how many times you mess up and no matter how badly, your video and text file won’t be touched. You might as well have a pane of unbreakable glass between you and your text file and video.
Now, just to see how this works, keeping in mind that it’s impossible to damage your original files, start the video. Then use your cursor to click Apply for a few moments and let go. You’ll see the words of text on the screen for as long as you press Apply, then they’ll disappear when you let go of Apply. On the left, the highlighter will automatically jump down to the next line of text. Press Apply again. Press 2, 3, 4 times in a row, just to see what it’s doing and to get familiar with the Apply button. If you press and hold, the text will stay up there until you let go (however, after uploading your finished work, Google won’t always respect your timings and your finished subtitles will often leave the screen before you intended).
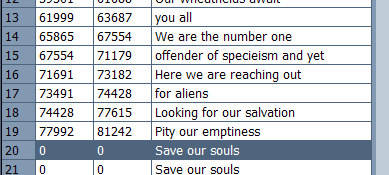
You will notice that the 0’s to the left of each line of text now have numbers in them. The program is putting in, in milliseconds (I think) when you first pressed Apply and how long you pressed Apply. The first number is start and the second number is end. Like this (the right side of the screen is black because my screen capture program wouldn’t get the video, but the video was playing).
You can, at any time, click on the first line again, so it’s highlighted, then start the video from the beginning, and practice actually subtitling your video. If you mess up, you can go back a few lines, click to highlight, then start the video again a few moments prior to the line you want to re-do, and wait with your cursor over the Apply button. When it gets to the line you messed up on, click Apply and continue on from there. You’re not affecting the video, you’re not affecting your text file, you’re just changing the numbers.
Of course, if you want to get rid of all the numbers and start fresh to avoid being confused, you can just re-load in the text file. It’ll ask you if you want to save what’s there and you say no. Since you haven’t affected your text file the numbers will all appear at zero again.
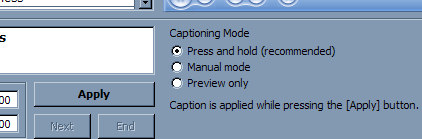
Now, you’ve practiced and you think you got the rhythm down, and you want to see what you’ve done so far. To preview how it’s working click the radio button next the the Apply button and change from
“Press and hold (recommended)” to “Preview only” and start your video from the beginning. The Apply button chould be greyed out and you should see subtitles! Those subtitles are NOT on your video…they’re in the program, being synched TO your video. At any time you can click the radio button back to Press and hold and start over again (or where you left off, if you think what you’ve done aready is good).
Some tips:
You can edit the lines and add new lines within the program, but I suggest going back to the original text file and making changes there too. That way, if for some reason you want to start from stratch with the text file again, you won’t have the original misspellings again. You can Add, Edit or Remove lines in the program.
If you think a line is too long on the screen, and you want some of the words on a separate line, but you don’t want to re-load in the text file, here’s what to do.
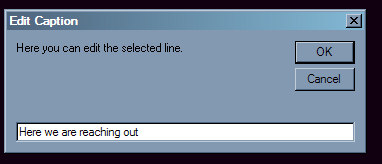
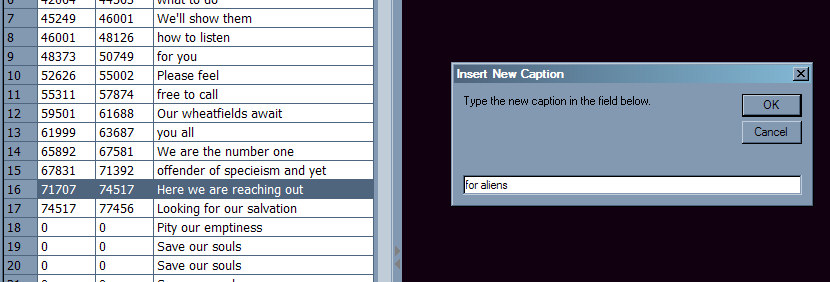
Go to Edit - Edit caption and it will bring up a box with the entire line in it. Highlight and delete the part of the line you don’t want anymore.
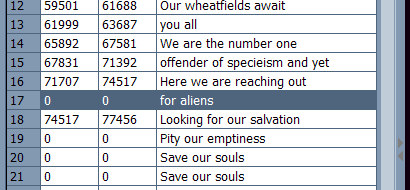
Go to Edit - Add Caption - Below Current and a box will pop up. Add the words you want in there, then click OK. You’ll see that an extra line was added with those words. Now, start the video again a few lines back and hover your cursor over the apply button. When it gets to the first line you edited, Apply, then Apply the next line, and continue on.
If you do that, I’d suggest going back to the text file and putting those words on the next line, so just in case you DO decide to start over from scratch, you won’t have to go through that again. Any changes you make in the program, make on the text file too, just in case.
Remember you can stop the video at any time, go back to any line and any point in the video at any time. There are no worries and you can practice and play around as much as you like.
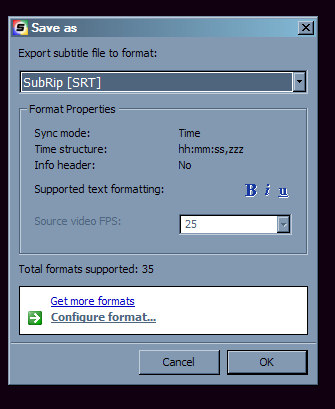
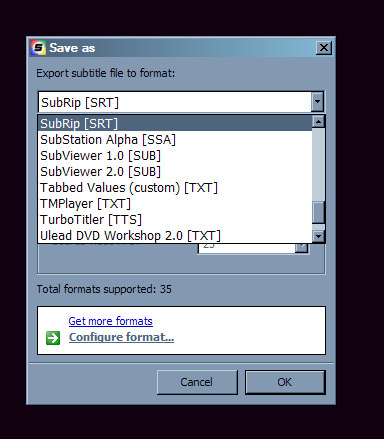
Ok, you’ve practiced and played around, then you finally got down to business, Applied the subtitles the way you want them, previewed and they look great. Now it’s time to save. Go to File - Save As. A box will pop up asking you what format you want to save in. There are several options. Don’t Panic! The format Google seems most comfortable with and what I used for all of my videos, was “SubRip [SRT]” Choose that option if it’s not already the default and click ok, then in the next box that pops up, choose where to save it. Again, it’s easiest if it’s in the same folder as the video. This file will save with the extension .srt (and I hope your system is set up so you can see extensions, thus subverting Microsoft’s boneheaded and moronic no-extensions-showing default). So my file is saveoursouls.srt.
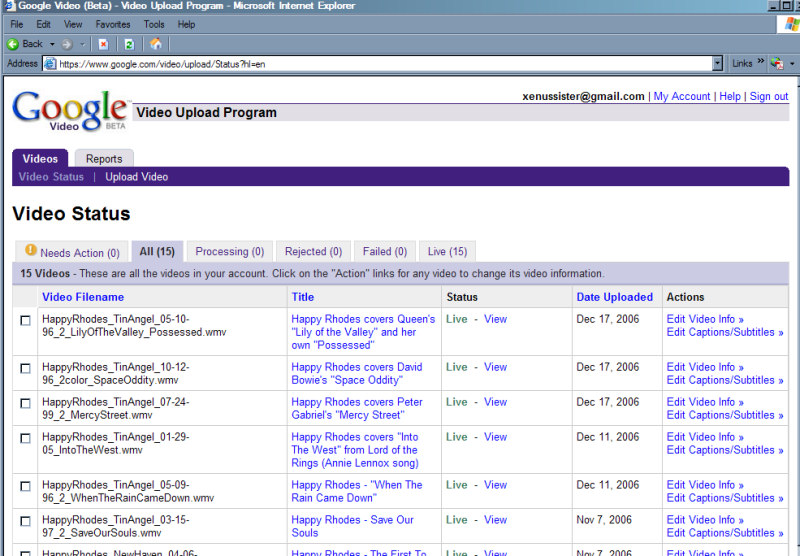
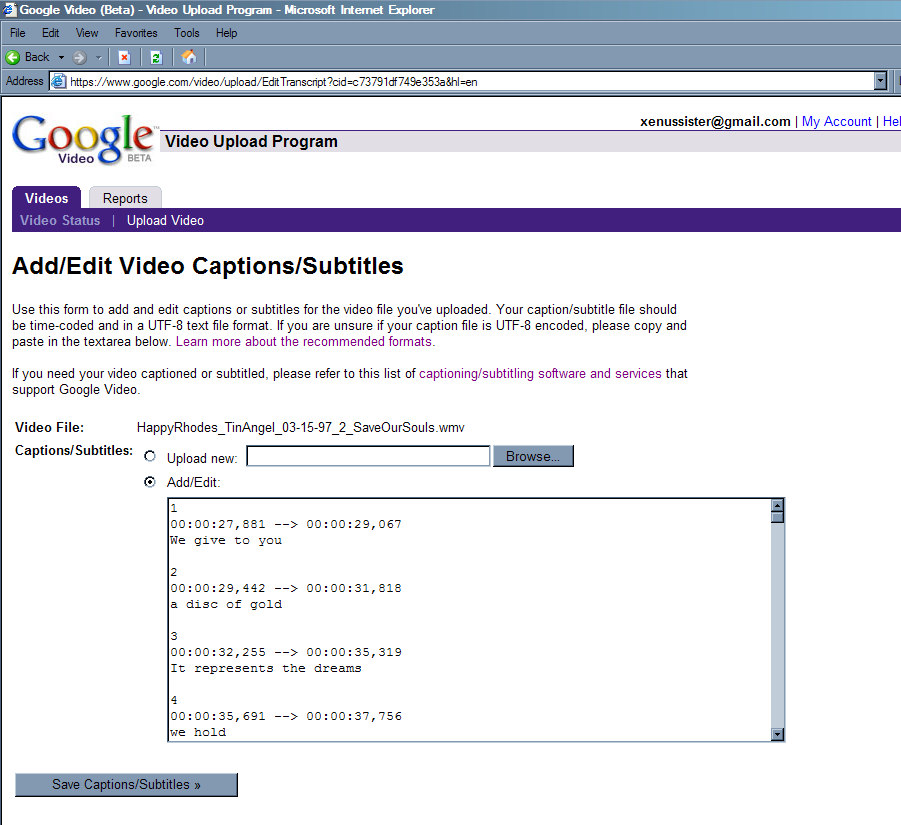
If your video isn’t already up on Google Video, upload it. When it’s up there go to your “Uploaded Videos” area. You’ll see over to the right, “Edit Captions/Subtitles” so click on it. That will bring up a page where you click the radio button for Upload New (if it isn’t already selected), then Browse to find the .srt file you just saved. Click Save Captions/Subtitles and when the file is uploaded you’ll be taken back to your Uploaded Videos page.
Btw, since I already had my srt file uploaded, Google assumed I wanted to make changes to the file I’d already uploaded. You can see from that screen shot what the .srt file looks like. DivXLand Media Subtitler put in the exact timings (00:00:27,881 –> 00:00:29,067) so I didn’t have to type any of that in. All I had to type was the text in my original text file (and I didn’t even have to do much of that, since Happy’s lyrics are online and I highlighted and pasted, then made changes as necessary and added in the patter).
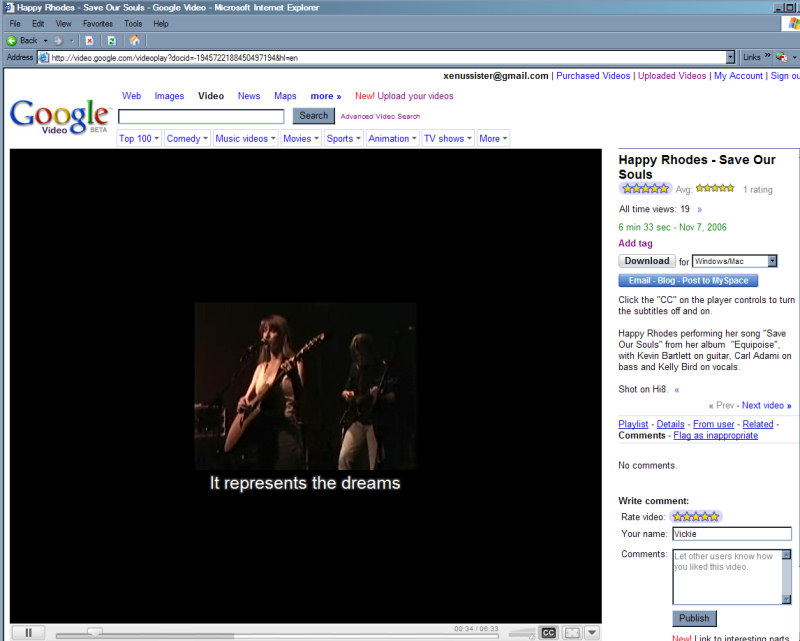
Your subtitles won’t appear immediately. Google has to do their voodoo to synch up the srt file with the video file. It could take hours, even up to 24 hours. I’ve had some that appeared within a few hours, and one that took over 24 hours. If you check your page you’ll know if your captions are there even before you watch the video because down at the bottom there will be a CC icon, which you can use to turn the subtitles on and off. If there are no subtitles, the CC isn’t just greyed out, it not there at all.
I typed all this in for the Straight Dope Message Board, but I was thinking that if what I’ve just typed in was useful, I’d save all this in html and put it up on the web somewhere, so if this has been helpful please let me know. Any suggestions on content (could it be clearer, did I leave something out, any confusion) please let me know that too. Any questions/Comments would be welcome.
Here are some other examples of captioned videos on Google Video (nice NOVA’s). As you can see, there aren’t very many captioned videos there yet, but I hope it catches on and more people do it.