I play tuba. Or rather, I used to, decades ago. I don’t play any more, because who actually has their own tuba?
But what I do have, is access to a makerspace. Several of them, in fact. And so, some years ago, I decided I would make my own tuba. My goal is to be able to do the whole thing on a budget of $100 or less, which would be a big deal, given that a new tuba usually costs more like $10,000. Once it’s done, I plan to share the full design online.
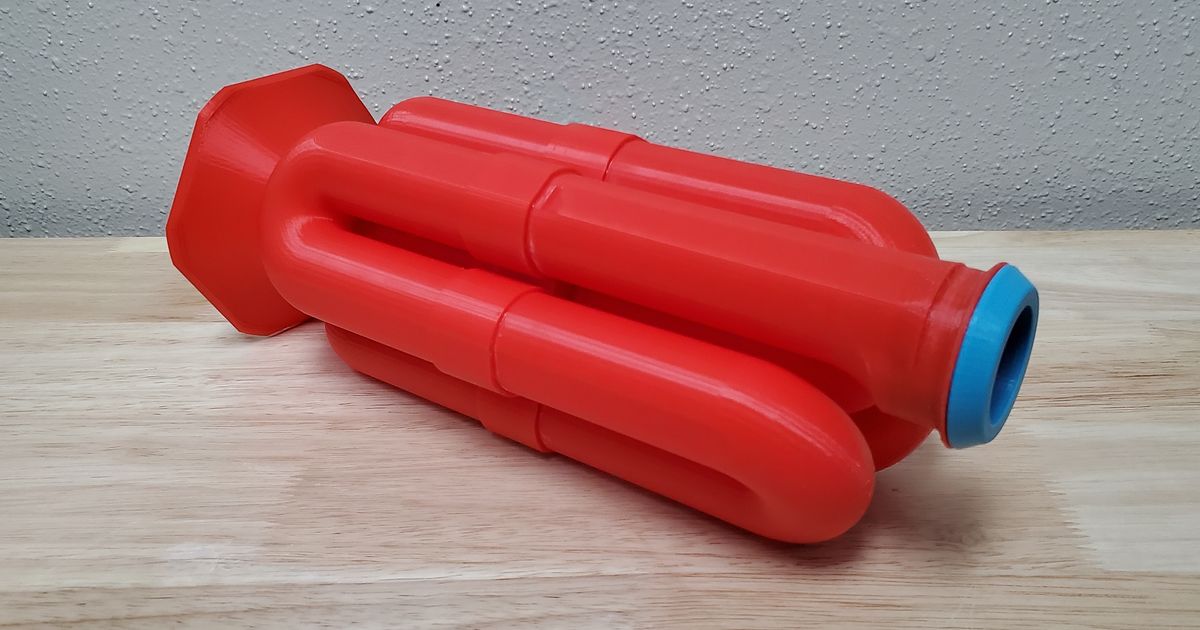
It’s been a long time in the making, but I’m now close enough to done that I think I can start talking about it. The framework is made from laser-cut quarter-inch wood panels. Fiddly bits, like the valve assembly, are 3D printed, plus a few other odds and ends I couldn’t find already made. Small tubing will be PVC (plus a little bit of thin brass tubing, for tuning slides), long straight tubing will be rolled-up posterboard, and long curved tubing will be papier-mache on a chicken-wire substrate.
As of Thursday, I finally finished the last of the wood panels, and assembled the whole thing.
I’m rather attached to it, myself. And whatever you’re seeing in my avatar, it wasn’t my doing: That avatar started its life as a Wingding.
The valve assembly is finished (thank God! That thing was a beast to get right), and so far as I can tell, printed correctly. And that’s the largest single printed piece (most of the rest of the printed pieces are just mundane things like U-bends). The materials shouldn’t actually matter, though: In a brass instrument, it’s the air that’s producing the actual sound. The brass (or whatever; tubas have been made out of a variety of other materials) is just to keep the air in the right shape.
I don’t play the tuba or build anything, but I think this is a fascinating project and can’t wait to see how it turns out!
Also, I pictured Chronos as having a lot more wrinkles and facial hair.
What do you expect the longevity of the rolled up posterboard and paper mache to be once you start blowing wet air/spit through it? Are you treating those components for water resistance?
Everything is going to get a good coat of paint and/or urethane clear-coat. The wood probably isn’t too water-resistant on its own, either (it’s quarter-inch pressboard). How long will that last? I dunno, but it won’t be difficult to repair, at least. I’ll probably also put some sort of coating on the interior of the printed pieces, because 3d printed pieces tend to be a bit porous.
The valve tubing will have spit valves, though I expect that it probably won’t condense as much as brass would.
So, since the last post, a couple of new developments. First, a minor one: I disassembled the top and bottom segments, so I could get pictures of them disassembled, and also fix a couple of minor issues (one part needed a little sanding, one needed a slight cut). I then re-assembled them and glued them. I’m thinking that I might not even need to glue the middle section: When the top and bottom sections are joined to it, everything is locked in place.
More significantly, after consulting with my über-crafty mom, I concluded that it’d be tough to get chicken wire to the right curvature to handle the half-torus-except-tapered curved tubing sections. I came up with a different plan, that should work better: Coiling a single strand of wire into a helix, and using that as the papier-mache substrate.
Well, “better idea” doesn’t necessarily mean “good”. I think it worked well enough for the smallest curved tube, but for the larger ones, it was a pain to get it in at all, and it ended up awfully irregular. When I do the curved tubes in the top segment, I think I’m going to start by putting in four strands at the “latitude” lines of the torus, and then using those as the basis for the helix. Unless someone has a better idea than that (that doesn’t involve re-doing all of the framework)?
Why not 3D print everything? Presumably the bell is a little too large for your 3D printer, but you can make snap-fit sections. Or use one of many other attachment methods, like glue or screws.
First, for the large tubes, I’d need to cut it up into a lot of pieces to fit in the printer. Could be done, but it’d be annoying. Second, that much filament would start to get seriously expensive.
Well, I didn’t necessarily mean the cylindrical portions. Though I might have gone for cardboard shipping tubes rather than rolled posterboard.
But for the complex curves, you can design something that snaps together radially, like flower petals. It also has the advantage that it can lay diagonally on the printer bed, increasing the effective dimensions. How big is the bell, and what’s the printing volume on your printer?
3D printer filament is only ~$15/kg shipped. Doesn’t seem like a huge deal even for a $100 total budget.
If you’re gonna use paper mache for a shape like that you should make a mold. Could be paper mache over a cardboard core. You can shape it the way you want. Use a lazy Susan tray as a wheel to shape it like clay. When it’s done you can wind cord around it while adding a layer of paper mache.
The catch is that, once you’re past the valves, there aren’t actually any cylindrical portions. The diameter is constantly increasing. I’m told that that’s an essential component to the sound of a tuba. Still, a frustrum of a cone isn’t too difficult with rolled material.
Hm, the numbers I’ve seen are more like $50/kg. That might be out of date, though: I’m not the one who keeps the makerspace supplied.
Could you give more detail on how to make this mold? Keep in mind, while I do want many copies of this thing made eventually, they won’t be made by me: I’m expecting (or at least, hoping for) many folks each making one, starting from downloadable files. So there’s no economy in making a reusable mold, if that’s the idea.
Ahh, ok. Well, rolled posterboard makes sense in that case.
$28 for a 2-kg black+white bundle:
There’s some ultra-expensive filament out there with impregnated carbon fiber and such, but plain old generic PLA is about $15. Maybe $20 for a name brand.
That said, the makerspace might be charging you $50/kg to pay for printer upkeep and such. That’s not totally unreasonable depending on what’s included.
Strictly speaking, the makerspace isn’t charging me anything, since nowadays I’m using the one at my school, which is funded through grants and such. The one at the library, though, charges $50/kg (well, 5 cents per gram, those usually being more useful units for this), though, so that’s the figure I’ve been using for my budgeting. Although now that I double-check, the one at CWRU, which is also publicly-accessible, is down to the $15 figure you mention.
Then again, my primary target market is other schools, whose spaces are also grant-supported. So maybe I should be basing on the marginal resupply cost, or maybe I should be counting it as free. I dunno.
Roll a cone out of strong cardboard. Pile on paper mache made from small pieces of paper so you can shape it with your hands. Find any rotating platform you can and place the construction on top of that while the it’s still wet like a pottery wheel to smooth the outside. Let it dry, sand or file it smooth and coat with a layer of varnish. You’ll need to coat it with wax or something for a release. Then layer on more paper to make the bell. Coil cord or wire around it for strength, add more paper and turn it smooth again. You could end up spending the most time tearing up little bits of paper.
If you make the cone out of cardboard gores it can be much closer to the correct shape to start with. A simple cone might need a lot of paper to get to the shape. A mold is a bunch of work initially that won’t be reused but you can control the shape very well.