Thanks. They’re floating, not adhesive. The underside has air channels to allow water that gets underneath to evaporate. In other brands you can get a wide range of colors, but I chose these because they’re cheaper and match the carpet tiles in the sun room. These aren’t the exact ones, but they’re very similar.
I guess that would make sense for a basement, wouldn’t it? Easy to replace a tile or two if they were stained or otherwise ruined.
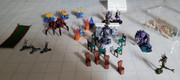
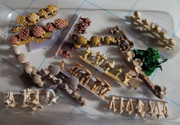
Recently painted or repainted minis. Mostly printed including some super fine detail mushrooms.
I just started printing clear. The resin is even lower odor than the grey washable I started with. Works very well and is very clear.
![]()
![]()
I am having a hard time adjusting the prints so the bases remove from the plate fairly easily. I’m working on this part.
I bought The Missus some LED ‘naked bulb’ lights for Valentine’s Day. We put them up when we got home. (Also, we assembled the new catio heater I got her for V-Day.) That reminded me that I turned the patio into a catio a few years ago. I made four sliding doors on pocket door tracks, added uprights to the patio area, and fenced it in to protect the cats.

Cool. I must have painted a couple hundred mushrooms for various gnome or fairy gardens. Being able to print my own would be great. Each of the strips of mushrooms are printed separately?
How about painting them? Any difference? I usually use flat white or flat light grey spray paint for primer.
Somebody always has to show up in these threads to show off their hand built catio, just to make some of us cat herders feel bad. ![]()
All the mushrooms were printed at the same time. With a resin printer, doing many prints at once is simple and usually works.
Painting them is pretty easy. Basically if you want them not translucent, give a fast primer first with just a brush. Simple enough. I’ll post some water elementals I printed and we painted later.
Looking forward to it, thanks. You’re really helping me gain a lot of knowledge before I dive in on this.
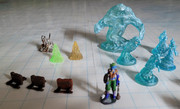
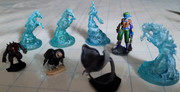
Above are the recent paints. These show clear prints lightly painted for translucent effects. I did the base coats on the water elementals and my daughter added the foam effects.
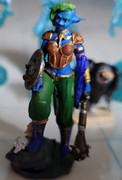
She also put the extreme detail on the Firbolg girl.
The wraiths are lightly painted in fluorescent paints. The mine car stops were just brown plastic that I lightly detailed. The Cloaker (manta ray mini) vulture and demon are just me.
For coating the clears, use a soft brush to lightly wet them first, them apply just a little paint at a time and spread it out, ensuring you’ve kept the translucence.
I seem to have figured out the settings for removing the completed figures from the plate with harming the figures or myself.
I calibrated the zero using the self-leveling. Then went up by .4mm and set that as the zero.
Also in the splitter I set the Bottom layers down to 4 and exposure time down to 40. (I’m not fully sure why ![]() )
)
Nice work on the minis! I used to paint a bit but we got a kitten so it was impossible to leave anything out without it getting batted to the floor and chased under the furniture. By the time she grew out of that a bit, Covid killed all my in-person games and it’s a lot less fun for me to paint and know they’ll never see play ![]()
On a happier note, I recently rescued a c.2001 Dell Dimension beige box from the work closet and gutted it out to install modern components. This led to a self-taught crash course in case modding since I had to saw a hole in the front to install a fan and cut away metal in the rear for the power cables on the new power supply. And trim the plastic to properly fit over it as well. Plus stuff like figuring out the unintuitive front panel wiring so the buttons and lights would work correctly with the modern motherboard, replacing the CD-ROM with a vent/fan and stashing a USB hub behind the 3.5" disk drive. Turned into a fun little project and I still have some internal tweaks but I’m happy with how it’s coming out.
Imgur Gallery link since I’m not 100% on how to add pics without them being obnoxiously large or something: 2001 Dell Dimension Sleeper Build - Album on Imgur
Very cool, I use to build computers and it was fun. One budget crunch at work I even got to do it on the job.
I only do repairs and minor upgrades now.
My latest project was setting up a DIY carbon dioxide-generating system for a planted aquarium.
Typically people have accomplished this by buying a pressurized CO2 tank with gauges and a valve for controlling gas output, and hauling the empty tank to a sporting goods store or other place that does refills (and hoping they know what they’re doing).
The setup I’m using is DIY in the sense that I mix the citric acid, baking soda and water in the right proportions to create CO2 gas. The end result is faster-growing and healthier aquarium plants.
That’s pretty cool. Useful chemistry is always fun.
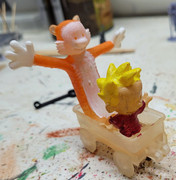
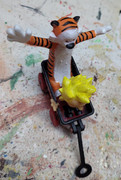
I found an stl file (3D print file) for Calvin & Hobbes in their wagon.
Many, many years ago my wife made a Christmas Ornament of Calvin and Hobbes in a Craftsman cart in lieu of a backordered Craftsman Cart. It has been on our tree ever since, (except 2020 when we had no tree). It is over 25 years old and made of paper and cardboard. It is nearly done.
I printed and cured this file 5 days ago and it looks great. I’ve been slowly painting it up and we’ll have a replacement ornament to continue the tradition.
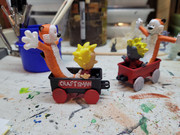
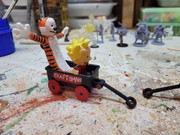
Our Christmas Ornament is complete. The other one for a friend is still in progress but getting closer.
 This was yesterday.
I added the Craftsman and then the stripes and faces today.

Installing new front brakes on my 2000 F-150.
I just decided to replace everything: pads, calipers, brackets, and rotors. $250 for everything (including shipping & tax), from RockAuto. I thought that wasn’t a bad price.


Installing spring clips and pads in calipers:

Don’t these look nice? All bolts properly torqued.


Now to do the other side. And then bleed the brakes.
The biggest problem is that my barn is freezing. I can only work for about 30 minutes before my fingers turn purple. And then I have to go in the house and warm them up.
We’re in the process this weekend of cutting out lots of brush, pruning roses, and removing some volunteer apple trees that the previous owner never addressed. All of this is around the edge of the property (a city lot). Right now the yard is a big jumble of brush, but I’ll try to get some now-and-after pictures. I dont think i have any actual before pictures. We have two more trees to remove and then we’ll likely start planning on building a deck where the trees were. I dont have the stamina for long physical projects, so we’ll see where that goes. Regardless, the deck will happen next spring at the earliest. This year is dedicated to cleaning flower beds, pruning and removing overgrown vegetation, and dreaming.
Do you have the rotors turned before installing them? In the old days (mid-90’s) a reputable shop would turn rotors, even brand new ones, before installation to ensure they were not warped. I have know idea if that’s still a best practice.
Hat
How do you directly embed?

Yea, it used to be common practice to “turn” (machine flat) the rotors. I am not sure how often it’s done nowadays for regular cars and trucks. Am guessing they’re simply replaced. Reasons:
- A lot of garages and mechanics don’t have an inhouse machine shop. So turning them requires a couple trips to a machine shop.
- Every rotor has a minimum-thickness spec. When you turn them, you are getting closer and closer to this value.
- A turned rotor will never be as “flat” and parallel as a new one.
- New rotors have gotten pretty cheap. When you add up the costs of turning old rotors, is it really worth it?
So I’m guessing a lot of mechanics will simply replace them instead of turning them. That’s what I did with my truck, as you can see from the photos. However, I do have a runout gauge and rotor thickness caliper in case I want to evaluate a rotor’s flatness & thickness, respectively. I haven’t had a chance to use them yet.
The hosting site has an option to share. Find the option that shares as a direct link (end in .jpg as an example). Post that and Discourse will resolve it.
You have more confidence in your abilities than I have in mine. Congratulations!
That turned out great!
Any chance you could use a Nipco heater, or would carbon monoxide buildup a problem in the space? Not sure of the size of the space you are working in.
I actually like doing all the things you list, I find them relaxing. The end of the day dreaming, with a cold beverage of your choice in your hand, may well be the most important part.
I’m beginning to think that my attempts to get into 3D printing are doomed. I’ve now ordered the printer twice thru Amazon Prime (different suppliers) and neither one of them showed up. ![]() I’m now wondering if I should just put it off for awhile, try again in a month or so.
I’m now wondering if I should just put it off for awhile, try again in a month or so.
So I had a partial DIY fail. Working with cherry wood is more difficult than I realized. I’ve built Oak furniture with no issues. Ash Oars. Cypress, Cedar and of course Pine. Cherry is kicking my butt.
Very tough to cut. Not really as strong as Oak. I’ll never use Cherry again. So I glued up pieces to make a triangular solid about 12" long with 2" sides. Cutting it is proving difficult. Scorching and trashing my bandsaw blade.
I’ve installed a brand new 1/2" low tooth count blade as reading up Cherry needs to be cut fast with a wide blade. I did a test run and it looks much better.
So now I need to make two more blanks to replace the trashed one. This is all to make a pair of upright wooden lamps.
The good news is the bandsaw is working really well since my complete overhaul. Now I just need to learn how to work cherry wood.