I’m currently using an 80,000 BTU torpedo heater that uses kerosene. But I haven’t insulated the barn yet, and it’s pretty big (40’ X 40’), so it’s only marginally effective.
So today I successfully fix the “water hammering*” associated with the cold water on the deep sink. I started this project with much trepidation. The faucet is old, the cutoff valve wasn’t turning. Plumbing.
So having isolated the issue to the cold water valve itself, I loosened the bonnet on the cut-off valve and was able to close the valve. Woot!
Tested water flow at the tap and just drops. Woot!
Opened tap a little and got a large adjustable to work on the old style bonnet. It turned, I was pleasantly surprised. I got the valve out and cleaned the seat a little and flushed some water through. Crud came out. I also cleaned the valve itself. Surprisingly it was in pretty good shape.
I put everything back together and closed the faucet and opened the cutoff and no leaks. Woot!
Opened the cold water and flushed some air and some dirty water and within 15 seconds was working much better. I opened it up full and let it run while putting my tools back. Still good. I checked it 30 minutes later and it is working great and no leaks. WOOT!
- What I call Water Hammering is apparently officially pipe harmonics or resonance in this case.
More plumbing: Finally installed a hose bib for the back of the house.
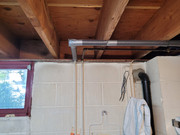
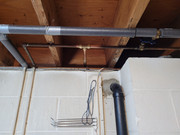
So a nice quick job using SharkBite fittings. A T and an adapter from thread to pipe. A nice 10" Freezeproof valve.
So the nice quick job took 2½ hours of course. But hey, no runs to Lowes to get more parts. Only 2 smallish mistakes on the way.
- First outside I weeded the area where the hose bib was going.
- I measure 3 times thankfully as something seemed off. Measuring off the window was a terrible idea, I was off by 4". But measuring off a drain vent got me to the right place.
- The cutoff valve thankfully held, mostly. Another advantage to SharkBytes, I didn’t need to shut off the entire house.
- I drilled a small test hole first. It was too low anyway and went into the support board for the rafters. Just missed the electric cable too.
- Second test hole was successful and I drilled a 1" hole for the hose bib to go through.
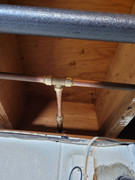
- So now I cut the pipe. No issue, I have 3 different pipe cutters and a good one for this job
- I put the T on the valve side and it didn’t go as far as I thought it would. Crap, I didn’t understand how this T actually worked.
- Watch video on how to remove the SharkByte fittings without the proper tool. OK, no problem. Wait problem, T finally popped off and went flying, bounced and went behind and under dryer of course. Son of a Bitch! I can barely fit back there, but I brought the 12" drill bit with me I was using for the test holes and rescued the T fitting.
- Inspect and wash off the T. It looks fine. Thankful for small favors.
- Cut about 3/8th inch of pipe off each side and fit the T on second time. Hey, this time it worked great.
- Get the Hose bib with the adapter through the hole so I can measure the pipe length I need.
- Cut pipe to size, go a hair big as seems safer. I can shorten it but I can’t stretch it.
- Fit everything together and tighten everything.
- Carefully remove and reapply one hose clamp (can see in picture to the left of the T.
- Test water, no leaks. No leaks? no leaks! That can’t be right? No leaks.
- Test water flow at deep sink and then hose bib. No Leaks.
- Open valve full. No leaks? No leaks.
- Tighten the packing nut to prevent weep leak at valve stem.
- Begin the clean up.
- Caulked the mistake hole and filled it with a dowel.
- Caulked around the hose bib inside and outside.
- Then as the shop vacc was already out, I cleaned out the stairs for the Bilco door I had been using to go from the deep sink to the hose bib location.
- Any leaks? No leaks!
- 30 minutes later go check one more time after I rested and wrote this up.
- NO LEAKS!
Replacing cooling system my car.


Machined some small objets d’art with my new CNC toy:

I did two real projects in cherry and don’t miss it one bit!
About 20 years ago my boss at the time was going to an auction at Willard Brothers Lumber in Central Jersey and he bought a nice stack of cherry at my request–it cost me about $130.
The original intent was to build a Shaker-style desk for my wife, shown below.
There was enough wood there that I took the nicest bits, with the coolest looking grain, and made a little Shaker-style end-table with tapered legs.
Both of the pieces turned out beautiful, but there sure were a lot of burn marks from my table saw and band saw that needed to be sanded out.
This is the nicest (and last) thing I ever made out of wood. I hate working with the stuff–the tools scare me too much. These days I prefer metal machine tools.


Your companion cubes cannot accompany you for the rest of the test and unfortunately must be euthanized. Please place your companion cubes into the Aperture Science Emergency Intelligence Incinerator.
I’m tempted to build a small “incinerator” now. But instead of fire, it has a comfortable little padded spot for the cubes, illuminated by a soft orange glow.
As I’ve posted elsewhere, I’ve recently acquired a bunch of new battery-powered lawn tools. On Saturday I installed a wall hanging system to organize them on my garage wall.
Left to right, top to bottom:
String trimmer (40V)
Two batteries, one in bin
Hedge trimmer (18V)
Leaf blower (40V)
18V battery charger
Two 40V chargers
Self-Propelled lawn mower (40V)

(Click on the picture to see the whole thing.)
Next project: wall hangers for all those stick tools on the right.
Very nice. It really helps to have the tools organized.
I should consider getting a cordless trimmer (‘weed whacker’). The cheap Black & Decker corded trimmer I’ve had for almost two decades is inconvenient.
Made another art piece:

I wrote the software to generate the layers, since I wasn’t happy with the results from existing fractal programs. Vectorized, then laser cut. Dyed the layers and mounted in the shadowbox.
I love to watch Mandelbrot dives. So I really love that piece.
Impressive!
Very cool.
I’m playing with macrophotography, hoping it may interest my great grandkids. So far it only interests me, but it may eventually get their attention.
Macro rigs have reached a high level of sophistication. Some posted results are breathtaking. But those rigs are beyond my available space and pocket book. So, it’s gotta be DIY.
I’m using Canon A650 digital cameras. I watch for them on ebay and get the ones ‘for parts only’ that likely work - usually about $25. The A650 will put a 12 MP array within 10mm of a subject and capture a very respectable image. It has a swing out viewer and it’s operation can be hacked by CHDK.
I got a rack and pinion platform and used wood and epoxy to mount it above an xy table (all ebay). it looks like this:

Illumination is strip LEDs mounted 3 to a side on a 3/8" maple plate that surrounds the lens.

My initial (not very noble) goal was to make a 10 foot long enlargement of a dragonfly wing to adorn my workshop wall. All I had to do was step exposures of the wing, stitch the images together in Photoshop, then divide them into 36 8x10 pages, print them out and glue the mosaic to a sheet of foam board.
OK, I did that (some of it) and found out that a dragonfly wing is crenulated rather than flat and the stepped images were all a different size because of the slight angular difference between the XY table and the plane of the lens.
I made a specimen mount of two microscope slides held together by magnets. This compresses the specimen onto a plane that is held parallel to the table:

Used an electronic leveler for the camera and the table, but could not get closer than 2/10 degree difference. However, The slide mount is stable enough that I can move the mount along the table so that the Z distance is constant. There is still a slight mismatch in the images but it I cannot see it in the result:

The GGKs are so far unimpressed. They live in a world of giant video and instant internet. I’ve printed this image as a 6 piece 4 foot mosaic that they can assemble as a puzzle. I’ll see how far I get with that. BTW: they are 3 and 6 - boys.
Thanks for the compliments about the Mandelbrot set.
Very nice! I may have to try something similar. I have an old Canon Powershot (a G7, I think) that would work. Maybe I could mount it on my CNC machine for a really precise XYZ platform.
Does Photoshop not handle slight angular distortions? I was working on some image stitching software recently, and the most advanced algorithms (using a homographic transform) could account for angular/perspective differences and correct for those.
That would make a great mount. I kept thinking a Bridgeport would solve my problem.
The G7 should give good results. With a CNC machine you can make a stable mount and specimen holder. Does the G7 have a flip out viewer? That’s handy.
I could not correct angular or radial distortions in Photoshop. There may be a method that I did not learn,
As simple as my set up is, it has yielded very satisfactory results. I noticed that the fragile wings seem to break at the same point along the leading edge. Enlarging that area in the photo showed a hinge:

Some googling described this as the nodus, a ligament hinge that runs diagonally across the gap.
What subjects do you have in mind.
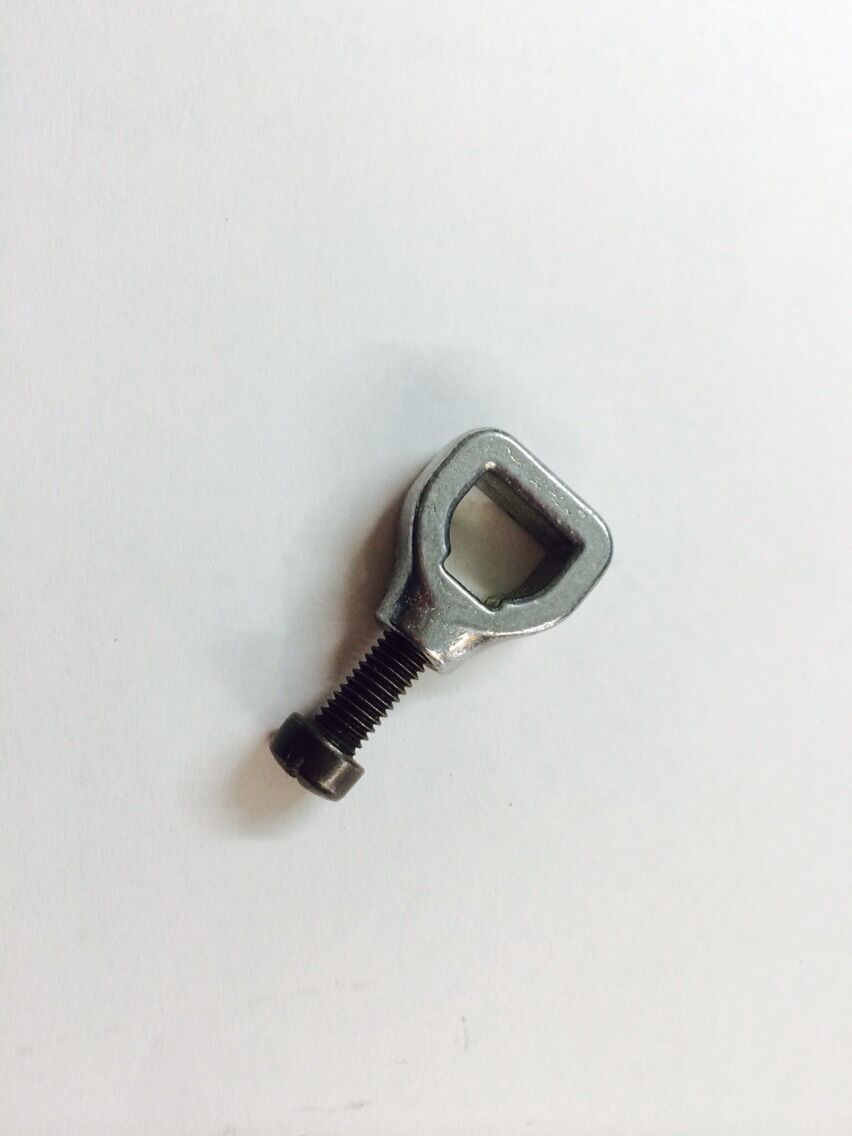
I machined myself a new Saw Blade Clamp for an old Black & Decker 358 Jigsaw.
I tried to order a replacement from Amazon and the part found on the search was for newer B&D Jigsaws. So I had to return that to Kohl’s. What might be the right part is going for at least $18 with shipping and I’m not 100% it is correct as the model number I have is not listed.
I found nothing in Lowes today to make work but while walking the aisles I realized I could probably take a strong nut and make a replacement piece from it.
So I found a nut just a little small for the shaft of the jigsaw.
I used a drill bit to remove some of the threads until it fit fairly snug.
I clamped the nut into my vice and drilled a hole into a flat side. The hole was too small for the screw but the size of the inner core of the screw.
Then I found the appropriate tap and threaded this hole.
The screw fit snugly, the assembly I made fit the shaft and it tightened a blade to the shaft extremely well. I tested and all worked perfectly.
I think I made a stronger replacement than the original which looks designed to fail to my critical eye.
So fun little machining project.
Note: A new cheap jigsaw is only about $30, thus why I balked at paying $18 for a crappy replacement part.
This is the part that failed:
This is the same model jigsaw:
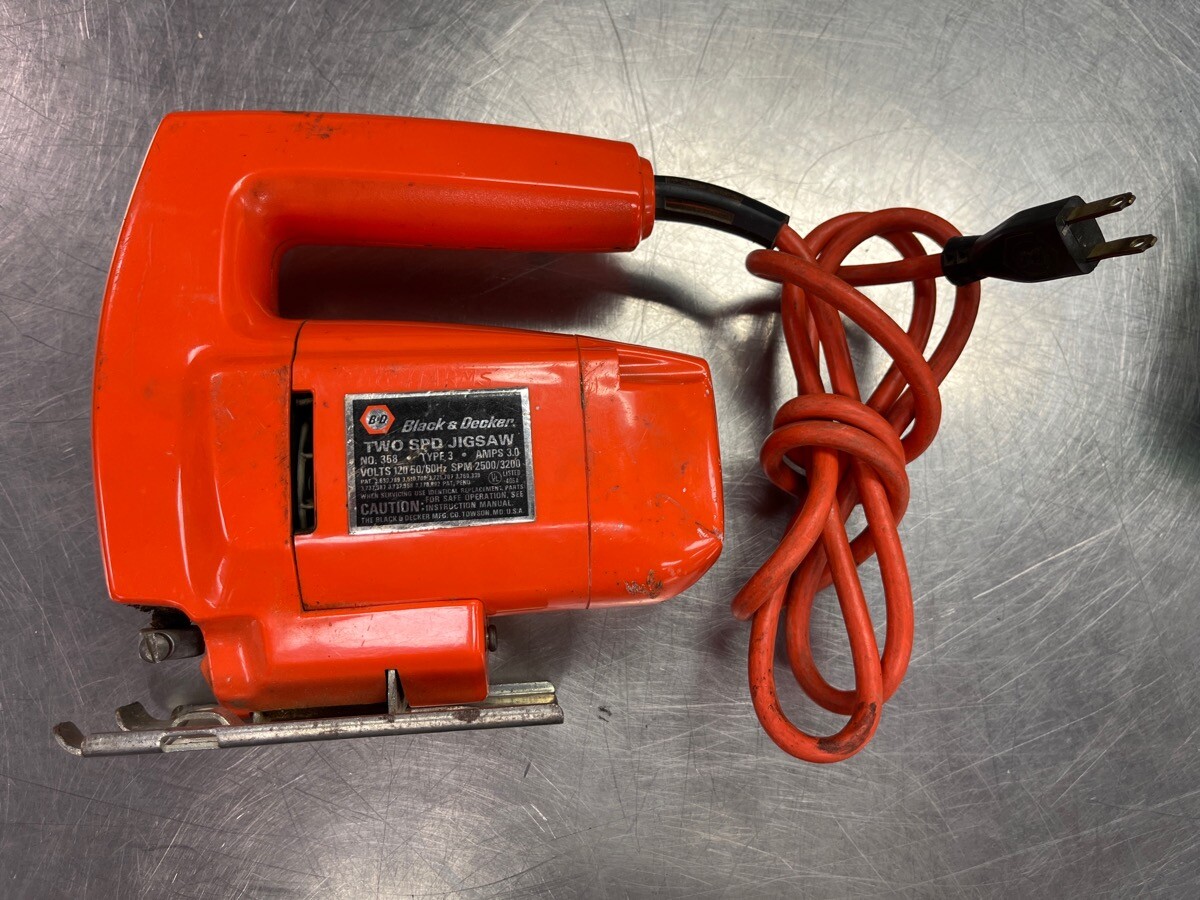
Small project. Added back and painted and saved it from the landfill that it was on its way to before I decided to try and save it.

